
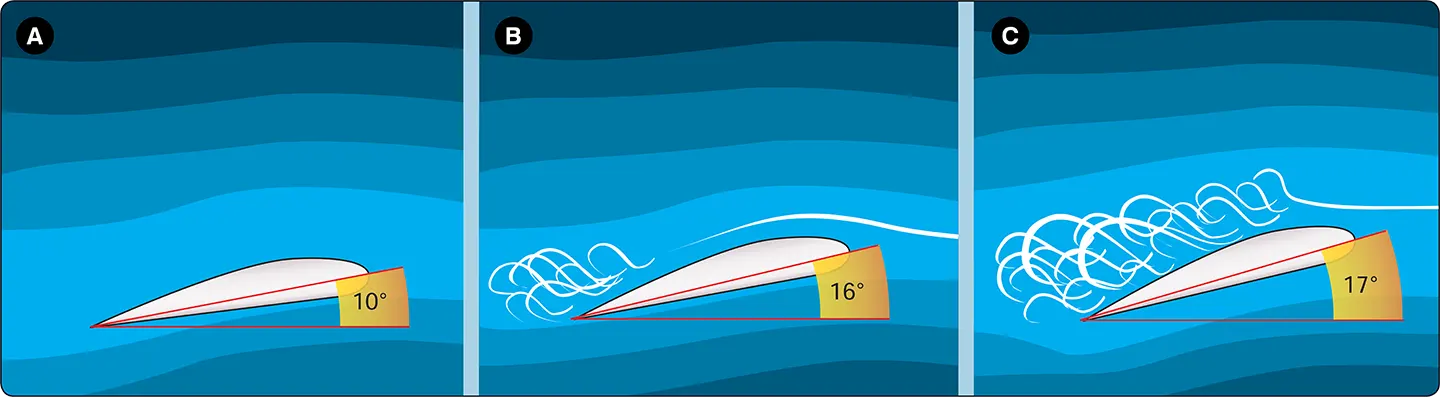
A stall is an aerodynamic condition which occurs when smooth airflow over the airplane’s wings is disrupted, resulting in loss of lift. Specifically, a stall occurs when the AOA—the angle between the chord line of the wing and the relative wind—exceeds the wing’s critical AOA. It is possible to exceed the critical AOA at any airspeed, at any attitude, and at any power setting. [Figure 1]
For these reasons, it is important to understand factors and situations that can lead to a stall, and develop proficiency in stall recognition and recovery. Performing intentional stalls will familiarize the pilot with the conditions that result in a stall, assist in recognition of an impending stall, and develop the proper corrective response if a stall occurs. Stalls are practiced to two different levels:
- Impending Stall—an impending stall occurs when the AOA causes a stall warning, but has not yet reached the critical AOA. Indications of an impending stall can include buffeting, stick shaker, or aural warning.
- Full Stall—a full stall occurs when the critical AOA is exceeded. Indications of a full stall are typically that an uncommanded nose down pitch cannot be readily arrested, and may be accompanied by an uncommanded rolling motion. For airplanes equipped with stick pushers, their activation is also an indicator of a full stall.
Although it depends on the degree to which a stall has progressed, some loss of altitude is expected during recovery. The longer it takes for the pilot to recognize an impending stall, the more likely it is that a full stall will result. Intentional stalls should therefore be performed at an altitude that provides adequate height above the ground for recovery and return to normal level flight.
Stall Recognition
A pilot should recognize the flight conditions that are conducive to stalls and know how to apply the necessary corrective action. This level of proficiency involves learning to recognize an impending stall by sight, sound, and feel.Stalls are usually accompanied by a continuous stall warning for airplanes equipped with stall warning devices. These devices may include an aural alert, lights, or a stick shaker all which alert the pilot when approaching the critical AOA. Most vintage airplanes, and many types of light-sport and experimental airplanes, do not have stall warning devices installed. However, certification standards permit manufacturers to provide the required stall warning either through the inherent aerodynamic qualities of the airplane (pre-stall buffeting) or through a stall warning device that gives a clear indication of the impending stall.Other sensory cues for the pilot include:
- Feel—the pilot will feel control pressures change as speed is reduced. With progressively less resistance on the control surfaces, the pilot needs to use larger control movements to get the desired airplane response. The pilot will notice the airplane’s reaction time to control movement increases.
- Vision—since the airplane can be stalled in any attitude, vision is not a foolproof indicator of an impending stall. However, maintaining pitch awareness is important.
- Hearing—as speed decreases, the pilot should notice a change in sound made by the air flowing along the airplane structure.
- Kinesthesia—the physical sensation (sometimes referred to as “seat of the pants” sensations) of changes in direction or speed is an important indicator to the trained and experienced pilot in visual flight. If this sensitivity is properly developed, it can warn the pilot of an impending stall.
Pilots should remember that a level-flight 1G published stalling speed is valid only:
- In unaccelerated 1G flight
- In coordinated flight (slip-skid indicator centered)
- At one weight (typically maximum gross weight)
- At a particular center of gravity (CG) (typically maximum forward CG)
Angle of Attack Indicators
An AOA indicator gives the pilot better situational awareness pertaining to the aerodynamic health of the airfoil. This can be referred to as stall margin awareness or knowing the existing margin between the current AOA and the critical AOA. While learning to recognize stalls without relying on stall warning devices is important, an AOA indicator provides an additional visual indication of the airplane’s proximity to the critical AOA. The FAA along with the General Aviation Joint Steering Committee (GAJSC) is promoting the use of Angle of Attack (AOA) indicators to reduce the occurrence of loss of control in flight.
Without an AOA indicator, the AOA is “invisible” to pilots. These devices measure several parameters simultaneously and determine the current angle of attack providing a visual image to the pilot of the current AOA along with representation of the proximity to the critical AOA. These devices can give a visual representation of the energy management state of the airplane. The energy state of an airplane is the balance between airspeed, altitude, drag, and thrust and represents how efficiently the airfoil is operating. With this increased situational awareness pertaining to the energy condition of the airplane, the pilot has additional information to help prevent a loss of control scenario.
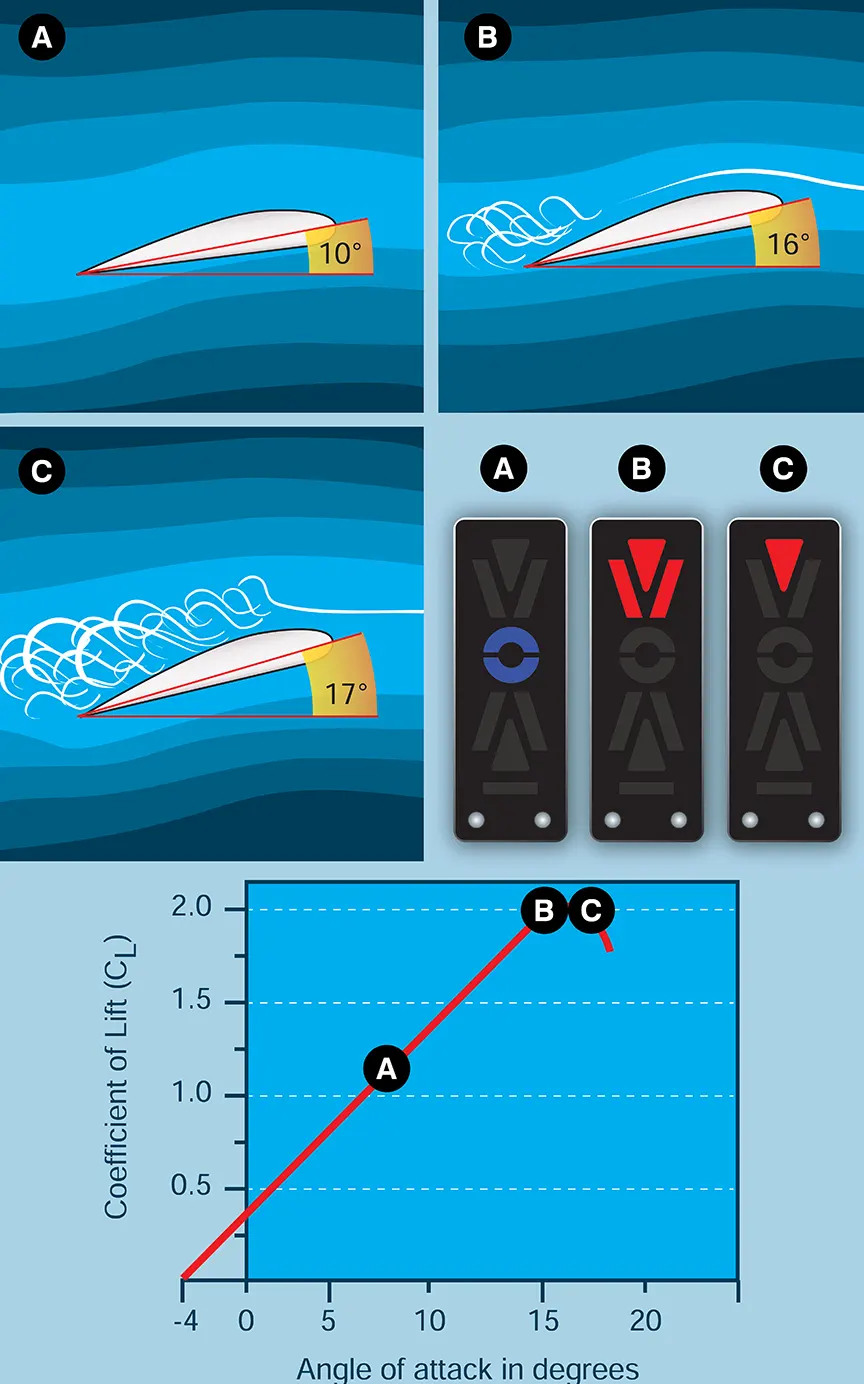
AOA indicators are increasingly affordable for GA airplanes. There are several different kinds of AOA indicators with varying methods for calculating AOA; therefore, proper installation and training on the use of these devices is important. AOA indicators measure several parameters simultaneously, determine the current AOA, and provide a visual image of the proximity to the critical AOA. [Figure 2] Some AOA indicators also provide aural indications, which can provide awareness to a change in AOA that is trending towards the critical AOA prior to installed stall warning systems. It’s important to note that some indicators take flap position into consideration, but not all do.
While AOA indicators provide a simple visual representation of the current AOA and its proximity to the critical AOA, they are not without their limitations. These limitations should be understood by operators of GA airplanes equipped with these devices. Like advanced automation such as autopilots and moving maps, the misunderstanding or misuse of the equipment can have disastrous results. Some items that may limit the effectiveness of an AOA indicator are listed below:
- Calibration techniques
- Probes or vanes not being heated
- The type of indicator itself
- Flap setting
- Wing contamination
Installation of AOA indicators not required by type certification in GA airplanes has been streamlined by the FAA. The FAA established policy in February 2014 pertaining to non-required AOA systems and how they may be installed as a minor alteration, depending upon their installation requirements and operational utilization, and the procedures to follow for certification of these installations. For updated information on this, please reference the FAA website at www.faa.gov.
If airplane equipment includes an angle of attack indicator, the pilot should know how the particular device determines AOA, what the display indicates, and the appropriate response to any indication. Pilots are encouraged to conduct in-flight training to see the indications throughout various maneuvers, such as slow flight, stalls, takeoffs, and landings, and to practice the appropriate responses to those indications. It is also important to note that some items may limit the effectiveness of an AOA indicator (e.g., calibration techniques, wing contamination, unheated probes/vanes). Pilots flying an airplane equipped with an AOA indicator should refer to the pilot handbook information or contact the manufacturer for specific limitations applicable to that indicator type.
Ground and flight instructors should make every attempt to receive training from an instructor knowledgeable about AOA indicators prior to giving instruction pertaining to or in airplanes equipped with an AOA indicator. Pilot schools should incorporate training on AOA indicators in their syllabi whether their training aircraft are equipped with them or not.
Stall Characteristics
Different airplane designs can result in different stall characteristics. The pilot should know the stall characteristics of the airplane being flown and the manufacturer’s recommended recovery procedures. Factors that can affect the stall characteristics of an airplane include its geometry, CG, wing design, and high-lift devices. Engineering design variations make it impossible to specifically describe the stall characteristics for all airplanes; however, there are enough similarities in small general aviation training-type airplanes to offer broad guidelines.
Most training airplanes are designed so that the wings stall progressively outward from the wing roots (where the wing attaches to the fuselage) to the wingtips. Some wings are manufactured with a certain amount of twist, known as washout, resulting in the outboard portion of the wings having a slightly lower AOA than the wing roots. This design feature causes the wingtips to have a smaller AOA during flight than the wing roots. Thus, the wing roots of an airplane exceed the critical AOA before the wingtips, meaning the wing roots stall first. Therefore, when the airplane is in a stalled condition, the ailerons should still have a degree of control effectiveness until/unless stalled airflow migrates outward along the wings. Although airflow may still be attached at the wingtips, a pilot should exercise caution using the ailerons prior to the reduction of the AOA because it can exacerbate the stalled condition. For example, if the airplane rolls left at the stall (“rolls-off”), and the pilot applies right aileron to try to level the wing, the downward-deflected aileron on the left wing produces a greater AOA (and more induced drag), and a more complete stall at the tip as the critical AOA is exceeded. This can cause the wing to roll even more to the left, which is why it is important to first reduce the AOA before attempting to roll the airplane.
The pilot should also understand how the factors that affect stalls are interrelated. In a power-off stall, for instance, the cues (buffeting, shaking) are less noticeable than in the power-on stall. In the power-off, 1G stall, the predominant cue may be the elevator control position (full up elevator against the stops) and a high descent rate.
Fundamentals of Stall Recovery
Depending on the complexity of the airplane, stall recovery could consist of as many as six steps. Even so, the pilot should remember the most important action to an impending stall or a full stall is to reduce the AOA. There have been numerous situations where pilots did not first reduce AOA, and instead prioritized power and maintaining altitude, which resulted in a loss of control. This section provides a generic stall recovery procedure for light general aviation aircraft adapted from a template developed by major airplane manufacturers and can be adjusted appropriately for the aircraft used. [Figure 3] However, a pilot should always follow the aircraft-specific manufacturer’s recommended procedures if published and current.
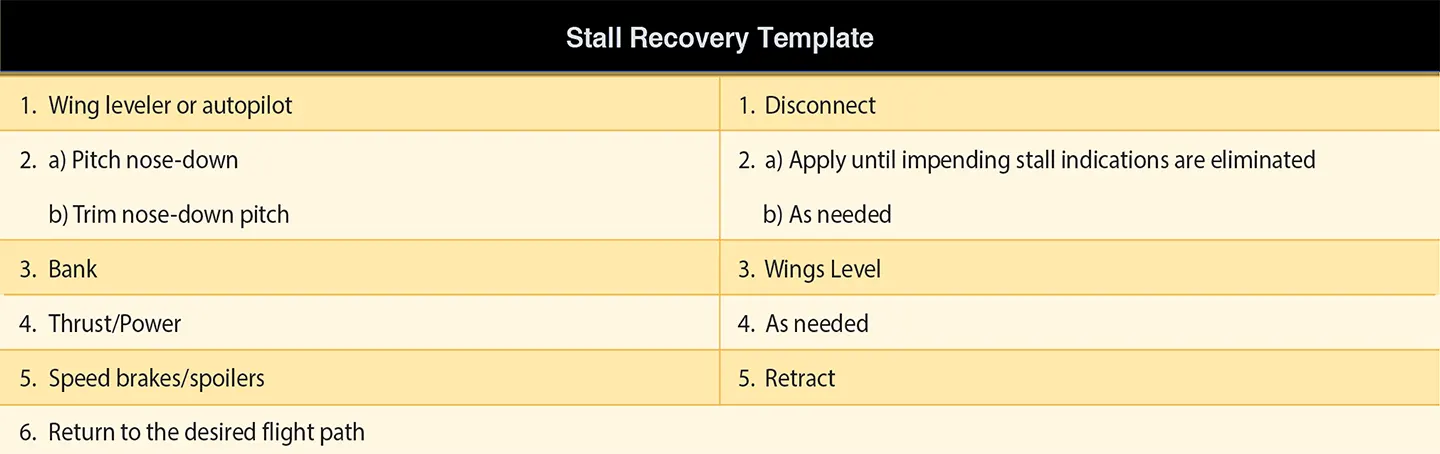
The recovery actions should be made in a procedural manner; they can be summarized in Figure 3. The following discussion explains each of the six steps:
1. Disconnect the wing leveler or autopilot (if equipped). Manual control is essential to recovery in all situations. Disconnecting this equipment should be done immediately and allow the pilot to move to the next crucial step quickly. Leaving the wing leveler or autopilot connected may result in inadvertent changes or adjustments to the flight controls or trim that may not be easily recognized or appropriate, especially during high workload situations.
2. a) Pitch nose-down control. Reducing the AOA is crucial for all stall recoveries. Push forward on the flight controls to reduce the AOA below the critical AOA until the impending stall indications are eliminated before proceeding to the next step.
b) Trim nose-down pitch. If the elevator does not provide the needed response, pitch trim may be necessary. However, excessive use of pitch trim may aggravate the condition, or may result in loss of control or high structural loads.
3. Roll wings level. This orients the lift vector properly for an effective recovery. It is important not to be tempted to control the bank angle prior to reducing AOA. Both roll stability and roll control will improve considerably after getting the wings flying again. It is also imperative to proactively cancel yaw with proper use of the rudder to prevent a stall from progressing into a spin.
4. Add thrust/power. Power should be added as needed, as stalls can occur at high power or low power settings or at high airspeeds or low airspeeds. Advance the throttle promptly, but smoothly, as needed while using rudder and elevator controls to stop any yawing motion and prevent any undesirable pitching motion. Adding power typically reduces the loss of altitude during a stall recovery, but it does not eliminate a stall. The reduction in AOA is imperative. For propeller-driven airplanes, power application increases the airflow around the wing, assisting in stall recovery.
5. Retract speedbrakes/spoilers (if equipped). This will improve lift and the stall margin.
6. Return to the desired flightpath. Apply smooth and coordinated flight control movements to return the airplane to the desired flightpath being careful to avoid a secondary stall. However, be situationally aware of the proximity to terrain during the recovery and take the necessary flight control action to avoid contact with it.The above procedure can be adapted for the type of aircraft flown. For example, a single-engine training airplane without an autopilot would likely only use four of the six steps. The first step is not applicable. The actual first step is the reduction of the AOA until the stall warning is eliminated. Use of pitch trim is less of a concern in a training airplane because most pilots can overpower the trim in these airplanes. Any improper trim can be corrected when returning to the desired flightpath. The next step is rolling the wings level followed by the addition of power as needed all while maintaining coordinated flight. If the airplane is not equipped with speedbrakes or spoilers, this step is also skipped. Returning to the desired flightpath concludes the recovery.Similarly, a glider pilot does not have an autopilot; therefore, the first step is the reduction of AOA until the stall warning is eliminated. The pilot would then roll wings level while maintaining coordinated flight. Since there is no power to add, this step would not apply. Retracting speedbrakes or spoilers would be the next step for a glider pilot followed by returning to the desired flightpath.
Stall Training
Practice in both power-on and power-off stalls is important because it simulates stall conditions that could occur during normal flight maneuvers. It is important for pilots to understand the possible flight scenarios in which a stall could occur. Stall accidents usually result from an inadvertent stall at a low altitude, with the recovery not completed prior to ground contact. For example, power-on stalls are practiced to develop the pilot’s awareness of what could happen if the airplane is pitched to an excessively nose-high attitude immediately after takeoff, during a climbing turn, or when trying to clear an obstacle. Power-off turning stalls develop the pilot’s awareness of what could happen if the controls are improperly used during a turn from the base leg to the final approach. The power-off straight-ahead stall simulates the stall that could occur when trying to stretch a glide after the engine has failed, or if low on the approach to landing.
As in all maneuvers that involve significant changes in altitude or direction, the pilot should ensure that the area is clear of other air traffic at and below their altitude and that sufficient altitude is available for a recovery before executing the maneuver. It is recommended that stalls be practiced at an altitude that allows recovery no lower than 1,500 feet AGL for single-engine airplanes, or higher if recommended by the AFM/POH. Losing altitude during recovery from a stall is to be expected.
Approaches to Stalls (Impending Stalls), Power-On or Power-Off
An impending stall occurs when the airplane is approaching, but does not exceed the critical AOA. The purpose of practicing impending stalls is to learn to retain or regain full control of the airplane immediately upon recognizing that it is nearing a stall, or that a stall is likely to occur if the pilot does not take appropriate action. Pilot training should emphasize teaching the same recovery technique for impending stalls and full stalls.
The practice of impending stalls is of particular value in developing the pilot’s sense of feel for executing maneuvers in which maximum airplane performance is required. These maneuvers require flight in which the airplane approaches a stall, but the pilot initiates recovery at the first indication, such as by a stall warning device activation.
Impending stalls may be entered and performed in the same attitudes and configurations as the full stalls or other maneuvers described. However, instead of allowing the airplane to reach the critical AOA, the pilot should immediately reduce AOA once the stall warning device goes off, if installed, or recognizes other cues such as buffeting. The pilot should hold the nose-down control input as required to eliminate the stall warning. Then level the wings maintain coordinated flight, and then apply whatever additional power is necessary to return to the desired flightpath. The pilot will have recovered once the airplane has returned to the desired flightpath with sufficient airspeed and adequate flight control effectiveness and no stall warning. Performance of the impending stall maneuver is unsatisfactory if a full stall occurs, if an excessively low pitch attitude is attained, or if the pilot fails to take timely action to avoid excessive airspeed, excessive loss of altitude, or a spin.
Full Stalls, Power-Off
The practice of power-off stalls is usually performed with normal landing approach conditions to simulate an accidental stall occurring during approach to landing. However, power-off stalls should be practiced at all flap settings to ensure familiarity with handling arising from mechanical failures, icing, or other abnormal situations. Airspeed in excess of the normal approach speed should not be carried into a stall entry since it could result in an abnormally nose-high attitude.
To set up the entry for a straight-ahead power-off stall, airplanes equipped with flaps or retractable landing gear should be in the landing configuration. After extending the landing gear, applying carburetor heat (if applicable), and retarding the throttle sufficiently, the pilot holds the airplane at a constant altitude until the airspeed decelerates to normal approach speed. The airplane should then be smoothly pitched down to a normal approach attitude to maintain that airspeed. Wing flaps should be extended and pitch attitude adjusted to maintain the airspeed. Once in a normal approach, the pilot sets the power to idle.
When the approach attitude and airspeed have stabilized, the pilot should smoothly raise the airplane’s nose to an attitude that induces a stall. Directional control should be maintained and wings held level by coordinated use of the ailerons and rudder. Once the airplane reaches an attitude that will lead to a stall, the pitch attitude is maintained with the elevator until the stall occurs. The stall is recognized by the full-stall cues previously described.
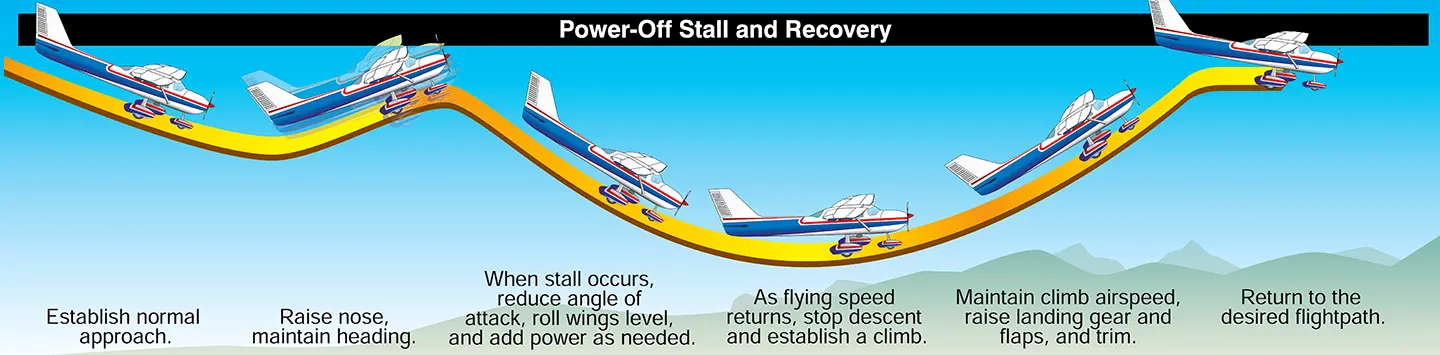
Recovery from the stall is accomplished by reducing the AOA, applying as much nose-down control input as required to eliminate the stall warning, leveling the wings, maintaining coordinated flight, and then applying power as needed. Right rudder pressure may be necessary to overcome the engine torque effects as power is advanced and the nose is being lowered. [Figure 4] If simulating an inadvertent stall on approach to landing, the pilot should initiate a go-around by establishing a positive rate of climb. Once in a climb, the flaps and landing gear should be retracted as necessary.
Recovery from power-off stalls should also be practiced from shallow banked turns to simulate an inadvertent stall during a turn from base leg to final approach. During the practice of these stalls, the pilot should take care to ensure that the airplane remains coordinated and the turn continues at a constant bank angle until the full stall occurs. If the airplane is allowed to slip, the outer wing may stall first and move downward abruptly. In a skid, the bank angle may increase further to a potentially dangerous attitude. The recovery procedure is the same, regardless of whether one wing rolls off first. The pilot should apply as much nose-down control input as necessary to eliminate the stall warning, level the wings with ailerons, coordinate with rudder, and add power as needed. In the practice of turning stalls, no attempt should be made to stall or recover the airplane on a predetermined heading. However, to simulate a turn from base to final approach, the stall normally should be made to occur within a heading change of approximately 90°.
Full Stalls, Power-On
Power-on stall recoveries are practiced from straight climbs and climbing turns (15° to 20° bank) to help the pilot recognize the potential for an accidental stall during takeoff, go around, climb, or when trying to clear an obstacle. Airplanes equipped with flaps or retractable landing gear should normally be in the takeoff configuration; however, power-on stalls should also be practiced with the airplane in a clean configuration (flaps and gear retracted) to ensure practice with all possible takeoff and climb configurations. When practicing takeoff stall recovery, the airplane should be at maximum power, although for some airplanes it may be reduced to a setting that will prevent an excessively high pitch attitude.
To set up the entry for power-on stalls, the pilot establishes the airplane in the takeoff or climb configuration and slows the airplane to normal lift-off speed while continuing to clear the area of other traffic. Upon reaching the desired speed, the pilot sets takeoff power or the recommended climb power for the power-on stall (often referred to as a departure stall) while establishing a climb attitude. The purpose of reducing the airspeed to lift-off airspeed before the throttle is advanced to the recommended setting is to avoid an excessively steep nose-up attitude for a long period before the airplane stalls.
After establishing the climb attitude, the pilot should smoothly raise the nose to increase the AOA, and hold that attitude until the full stall occurs. As described in connection with the stall characteristics discussion, continual adjustments should be made to aileron pressure, elevator pressure, and rudder pressure to maintain coordinated flight while holding the attitude until the full stall occurs. In most airplanes, as the airspeed decreases the pilot should move the elevator control progressively further back while simultaneously adding right rudder and maintaining the climb attitude until reaching the full stall.
The pilot should recognize when the stall has occurred and take action without delay to prevent a prolonged stalled condition. The pilot should recover from the stall by immediately reducing the AOA and applying as much nose-down control input as required to eliminate the stall warning, level the wings with ailerons, coordinate with rudder, and smoothly advance the power as needed. Since the throttle is already at the climb power setting, this step may simply mean confirming the proper power setting. [Figure 5]
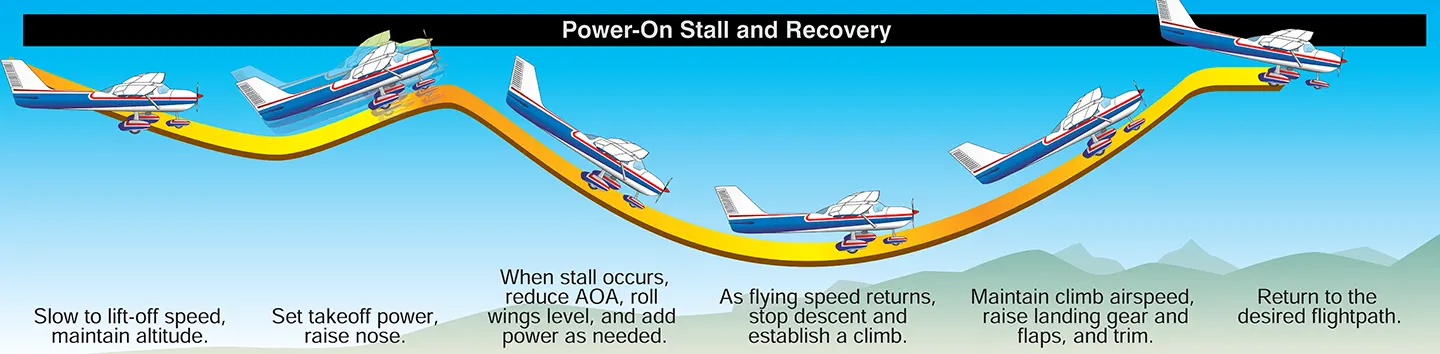
The final step is to return the airplane to the desired flightpath (e.g., straight and level or departure/climb attitude). With sufficient airspeed and control effectiveness, the pilot may return the throttle to the appropriate power setting.
Secondary Stall
A secondary stall is so named because it occurs after recovery from a preceding stall. A normal recovery usually involves pointing the nose of the airplane toward the ground. However, if a stall should occur at low altitude, the pilot’s natural impulse is to bring the nose up as soon as possible and to do so abruptly. This reaction is amplified as proximity to the ground increases. To demonstrate how this occurs at altitude, the pilot makes an abrupt recovery after one stall and exceeds the critical AOA a second time. Note that this stall may occur after any stall when the pilot does not sufficiently reduce the AOA by lowering the pitch attitude or attempts to break the stall by using power only. [Figure 6]
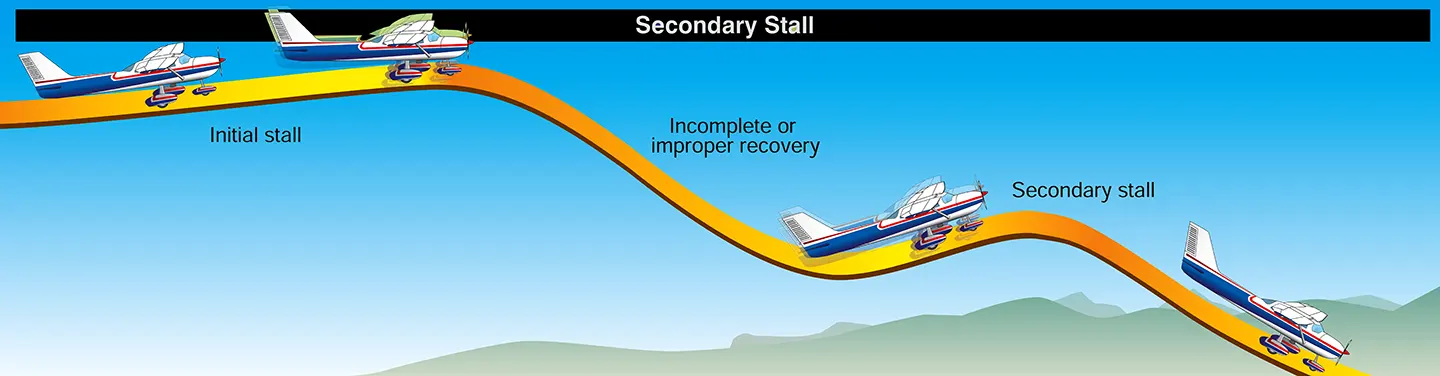
If a secondary stall occurs, the pilot should again perform the stall recovery procedures by applying nose-down elevator pressure as required to eliminate the stall warning, level the wings with ailerons, coordinate with rudder, and adjust power as needed. When the airplane is no longer in a stalled condition the pilot can return the airplane to the desired flightpath. For pilot certification, this is a demonstration-only maneuver. Only flight instructor applicants may be required to perform it on a practical test.
Accelerated Stalls
While pilots may understand the cause of an accelerated stall, it takes training to experience how these stalls develop and occur. The objectives of demonstrating an accelerated stall are to determine the stall characteristics of the airplane, experience stalls at speeds greater than the +1G stall speed, and develop the ability to instinctively recover at the onset of such stalls. This is a maneuver only commercial pilot and flight instructor applicants may be required to perform or demonstrate on a practical test. However, all pilots should be familiar with the situations that can cause an accelerated stall, how to recognize this type of stall, and how to execute the appropriate recovery should one occur.
At the same gross weight, airplane configuration, CG location, power setting, and environmental conditions, a given airplane consistently stalls at the same indicated airspeed provided the airplane is at +1G (i.e., steady-state unaccelerated flight). However, the airplane can also stall at a higher indicated airspeed when the airplane is subject to an acceleration greater than +1G, such as when turning, pulling up, or other abrupt changes in flightpath. Stalls encountered any time the G-load exceeds +1G are called “accelerated maneuver stalls.” The accelerated stall would most frequently occur inadvertently during improperly executed turns, stall and spin recoveries, pullouts from steep dives, or when overshooting a base to final turn. An accelerated stall is typically demonstrated during steep turns.
A pilot should never practice accelerated stalls with wing flaps in the extended position due to the lower design G-load limitations in that configuration. Accelerated stalls should be performed with a bank of approximately 45°, and in no case at a speed greater than the airplane manufacturer’s recommended airspeed, or the specified design maneuvering speed (VA) or operating maneuvering speed (VO).
It is important to be familiar with VA or VO, how it relates to accelerated stalls, and how it changes depending on the airplane’s weight. VA is the maximum speed at which the positive design load limit can be imposed either by gusts or full one-sided deflection with one control surface without causing structural damage. VO is a historical operating limitation applicable to certain airplanes only. It represents the maximum speed where, at any given weight, the pilot may apply full control excursion without exceeding the design limit load factor. Performing accelerated stalls at speeds up to the applicable VA or VO, ensures the airplane will reach the critical AOA, which unloads the wing, before exceeding the design load limit. At speeds above VA or VO, the airplane can reach its design load limit at less than the critical AOA. This condition makes it possible to add additional load and overstress the airplane. Additional information on the effects of aircraft weight on stall speeds and structural limits while maneuvering is available in the “Aerodynamics of Flight” of the Aeronautical Knowledge section.
There are two methods for performing an accelerated stall. The most common accelerated stall procedure starts from straight-and level flight at an airspeed at or below VA or VO. The pilot rolls the airplane into a coordinated, level-flight 45° turn and then smoothly, firmly, and progressively increase the AOA through back elevator pressure until a stall occurs. Alternatively, the pilot rolls the airplane into a coordinated, level-flight 45° turn at an airspeed above VA or VO. After the airspeed slows to VA or VO, and at an airspeed 5 to 10 percent faster than the unaccelerated stall speed, the pilot progressively increases the AOA through back elevator pressure until a stall occurs. The increased back elevator pressure increases lift and the G load. The G load pushes the pilot’s body down in the seat. The increased lift also increases drag, which may cause the airspeed to decrease. The pilot should know the published stall speed for 45° of bank, flaps up, before performing the maneuver. This speed is typically published in the AFM.
An airplane typically stalls during a level, coordinated turn similar to the way it does in wings-level flight, except that the stall buffet can be sharper. If the turn is coordinated at the time of the stall, the airplane’s nose pitches away from the pilot just as it does in a wings-level stall since both wings will tend to stall nearly simultaneously. If the airplane is not properly coordinated at the time of stall, the stall behavior may include a change in bank angle until the AOA has been reduced. It is important to take recovery action at the first indication of a stall (if impending stall training/checking) or immediately after the stall has fully developed (if full stall training/checking) by applying forward elevator pressure as required to reduce the AOA and to eliminate the stall warning, level the wings using ailerons, coordinate with rudder, and adjust power as necessary. Stalls that result from abrupt maneuvers tend to be more aggressive than unaccelerated +1G stalls. Because they occur at higher-than-normal airspeeds or may occur at lower-than-anticipated pitch attitudes, they can surprise an inexperienced pilot. Since an accelerated stall may put the airplane in an unexpected attitude. Failure to execute an immediate recovery may result in a spin or other departure from controlled flight.
Cross-Control Stall
The objective of the cross-control stall demonstration is to show the effects of uncoordinated flight on stall behavior and to emphasize the importance of maintaining coordinated flight while making turns. This is a demonstration-only maneuver; only flight instructor applicants may be required to perform it on a practical test. However, all pilots should be familiar with the situations that can lead to a cross-control stall, how to recognize and avoid this stall, and how to recover should one occur.
The aerodynamic effects of the uncoordinated, cross-control stall can surprise the unwary pilot because this stall can occur with very little warning and can be deadly if it occurs close to the ground. The nose may pitch down, the bank angle may suddenly change, and the airplane may continue to roll to an inverted orientation, which is usually the beginning of a spin. It is therefore essential for the pilot to follow the stall recovery procedure by reducing the AOA until the stall warning has been eliminated, then roll wings level using ailerons, and coordinate with rudder inputs before the airplane enters a spiral or spin.
A cross-control stall occurs when the critical AOA is exceeded with aileron pressure applied in one direction and rudder pressure in the opposite direction, causing uncoordinated flight. A skidding cross-control stall is most likely to occur in the traffic pattern during a poorly planned and executed base-to-final approach turn. There may be an unrecognized tailwind component and higher groundspeed on the base leg, which causes the pilot to turn late or with inadequate bank. The airplane overshoots the runway centerline, and the pilot attempts to correct by increasing the bank angle, increasing back elevator pressure, and applying excess rudder in the direction of the turn (i.e., inside or bottom rudder pressure) to bring the nose around further to align it with the runway. The difference in lift between the inside and outside wing will increase, resulting in an unwanted increase in bank angle. At the same time, the nose of the airplane slices downward through the horizon. The natural reaction to this may be for the pilot to pull back on the elevator control, increasing the AOA toward critical. Should a stall be encountered with these inputs, the airplane may rapidly enter a spin. The safest action for an “overshoot” is to perform a go-around. At the relatively low altitude of a base-to-final approach turn, a pilot should be reluctant to use bank angles greater than 30 degrees and should not make a skidding turn if correcting for any overshoot.
Before performing this stall, the pilot should establish a safe altitude for entry and recovery in the event of a spin, and clear the area of other traffic while slowly retarding the throttle. The next step is to lower the landing gear (if equipped with retractable gear), close the throttle, and maintain altitude until the airspeed approaches the normal glide speed. To avoid the possibility of exceeding the airplane’s limitations, the pilot should not extend the flaps. While the gliding attitude and airspeed are being established, the airplane should be retrimmed. Once the glide is stabilized, the airplane should be rolled into a medium-banked turn to simulate a final approach turn that overshoots the centerline of the runway.
During the turn, the pilot should smoothly apply excessive rudder pressure in the direction of the turn and hold the bank constant by applying opposite aileron pressure. At the same time, the pilot increases back elevator pressure to keep the nose from lowering. All of these control pressures should be increased until the airplane stalls. When the stall occurs, the pilot applies nose-down elevator pressure to reduce the AOA until the stall warning has been eliminated, removes the excessive rudder input and levels the wings, and adds power as needed to return to complete the recovery and return to the desired flightpath.
Elevator Trim Stall
The elevator trim stall demonstration shows what can happen when the pilot applies full power for a go-around without maintaining positive control of the airplane. [Figure 7] This is a demonstration-only maneuver; only flight instructor applicants may be required to perform it on a practical test. However, all pilots should be familiar with the situations that can cause an elevator trim stall, recognize its development, and take appropriate action to prevent it.
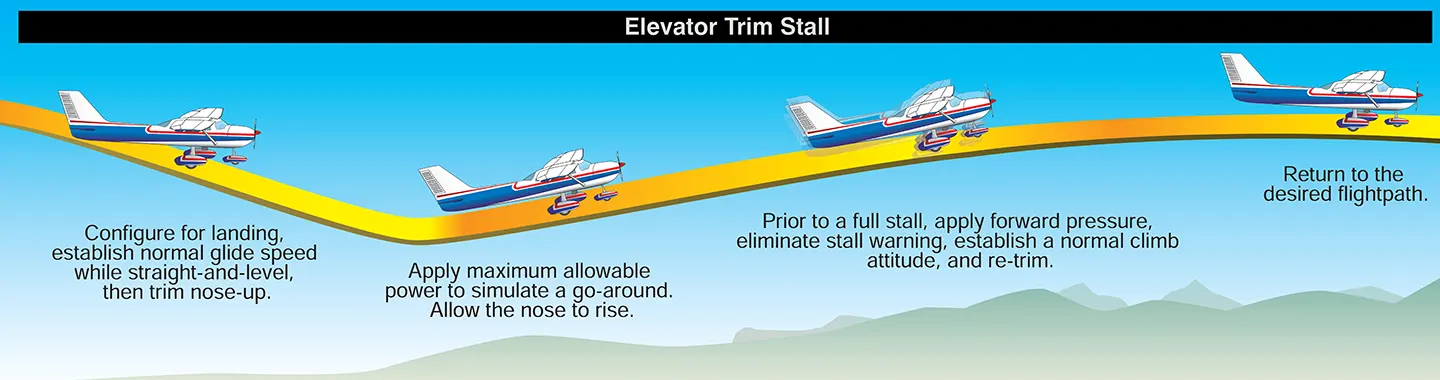
This situation may occur during a go-around procedure from a normal landing approach or a simulated, forced-landing approach, or immediately after a takeoff, with the trim set for a normal landing approach glide at idle power. The demonstration shows the importance of making smooth power applications, overcoming strong trim forces, maintaining positive control of the airplane to hold safe flight attitudes, and using proper and timely trim techniques. It also develops the pilot’s ability to avoid actions that could result in this stall, to recognize when an elevator trim stall is approaching, and to take prompt and correct action to prevent a full stall condition. It is imperative to avoid the occurrence of an elevator trim stall during an actual go-around from an approach to landing.
At a safe altitude and after ensuring that the area is clear of other air traffic, the pilot should slowly retard the throttle and extend the landing gear (if the airplane is equipped with retractable gear). The next step is to extend the flaps to the one-half or full position, close the throttle, and maintain altitude until the airspeed approaches the normal glide speed.When the normal glide is established, the pilot should trim the airplane nose-up for the normal landing approach glide. During this simulated final approach glide, the throttle is then advanced smoothly to maximum allowable power, just as it would be adjusted to perform a go-around.
The combined effects of increased propwash over the tail and elevator trim tend to make the nose rise sharply and turn to the left. With the throttle fully advanced, the pitch attitude increases above the normal climbing attitude. When it is apparent the airplane is approaching a stall, the pilot should apply sufficient forward elevator pressure to reduce the AOA and eliminate the stall warning before returning the airplane to the normal climbing attitude. The pilot will need to adjust trim to relieve the heavy control pressures and then complete the normal go around procedures and return to the desired flightpath. If taken to the full stall, recovery will require a significant nose-down attitude to reduce the AOA below its critical AOA, along with a corresponding significant loss of altitude.
Common Errors
Common errors in the performance of intentional stalls are:
- Failure to adequately clear the area.
- Over-reliance on the airspeed indicator and slip-skid indicator while excluding other cues after recovery.
- Inadvertent accelerated stall by pulling too fast on the controls during a power-off or power-on stall entry.
- Inability to recognize an impending stall condition.
- Failure to take timely action to prevent a full stall during the conduct of impending stalls.
- Failure to maintain a constant bank angle during turning stalls.
- Failure to maintain proper coordination with the rudder throughout the stall and recovery.
- Recovering before reaching the critical AOA when practicing the full stall maneuver.
- Not disconnecting the wing leveler or autopilot, if equipped, prior to reducing AOA.
- Recovery is attempted without recognizing the importance of pitch control and AOA.
- Not maintaining a nose down control input until the stall warning is eliminated.
- Pilot attempts to level the wings before reducing AOA.
- Pilot attempts to recover with power before reducing AOA.
- Failure to roll wings level after AOA reduction and stall warning is eliminated.
- Inadvertent secondary stall during recovery.
- Excessive forward-elevator pressure during recovery resulting in low or negative G load.
- Excessive airspeed buildup during recovery.
- Losing situational awareness and failing to return to desired flightpath or follow ATC instructions.
Spin Awareness
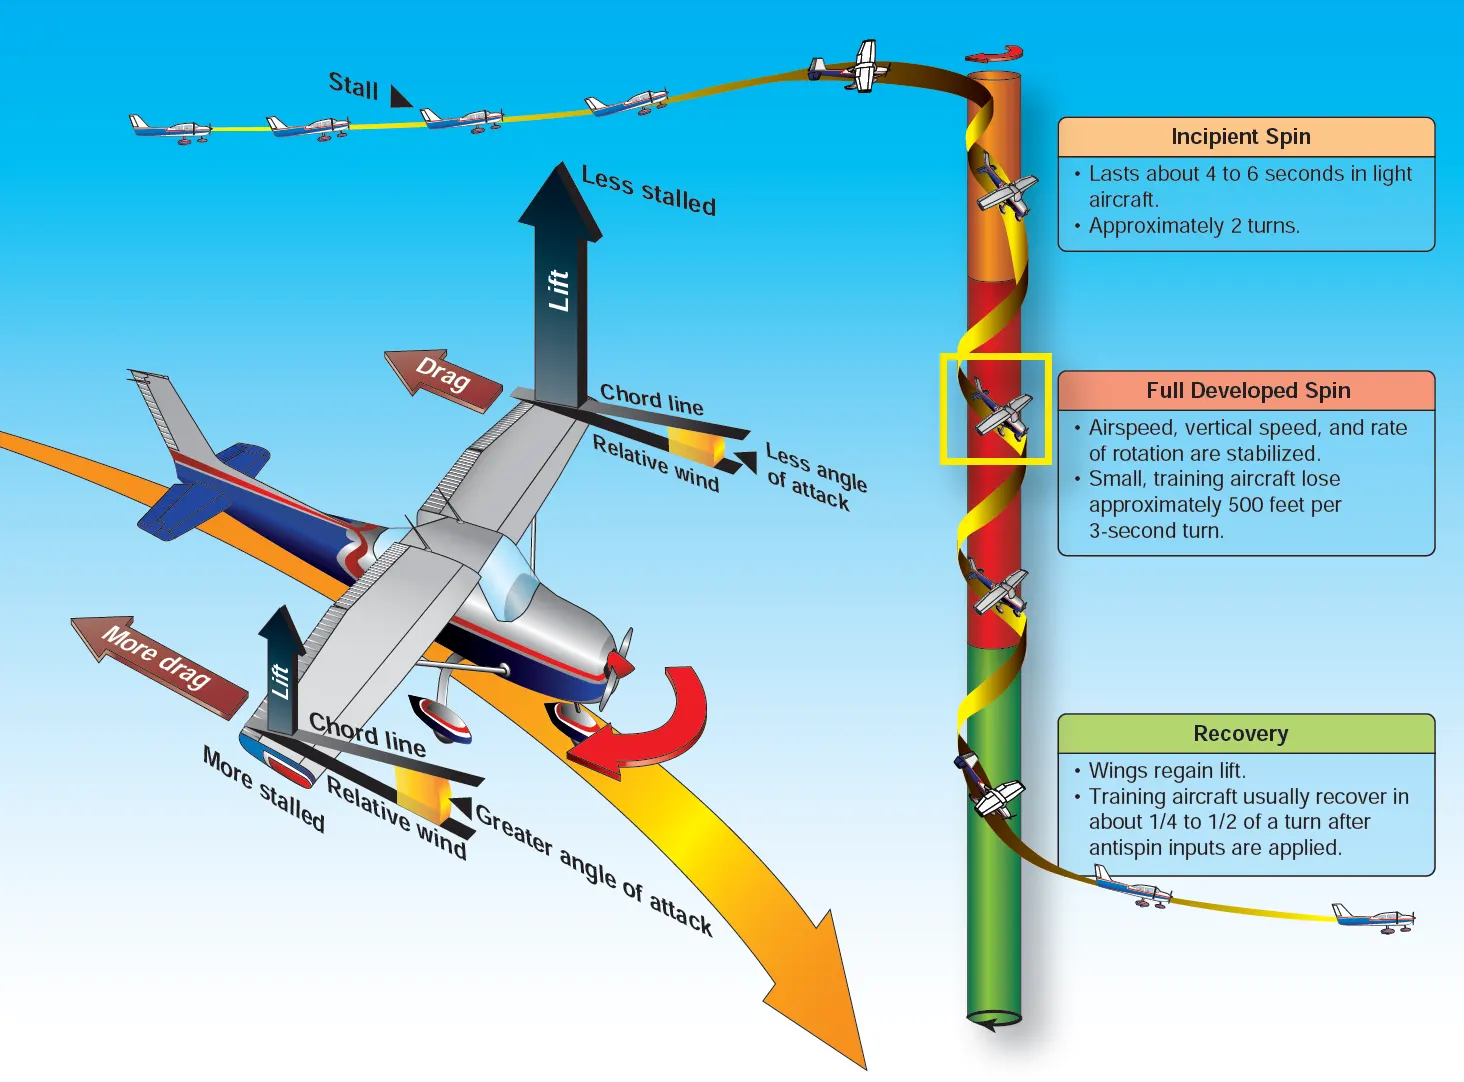
A spin is an aggravated stall condition that may result after a stall occurs. Mishandling of yaw control during a stall increases the likelihood of a spin entry. A spin results in the airplane following a downward corkscrew path. During a spin, the airplane rotates around its vertical axis affected by different lift and drag forces on each wing, and the airplane descends due to gravity, rolling, yawing, and pitching in a spiral path. [Figure 8] There are different types of spins. The spin type or types that occur in a particular airplane may be by airplane design, loading, control inputs, and density altitude. In all spins at least one of the wings is stalled. Refer to the airplane POH for spin recovery techniques appropriate to the make and model being flown. Techniques in the POH take precedence over information in this section.
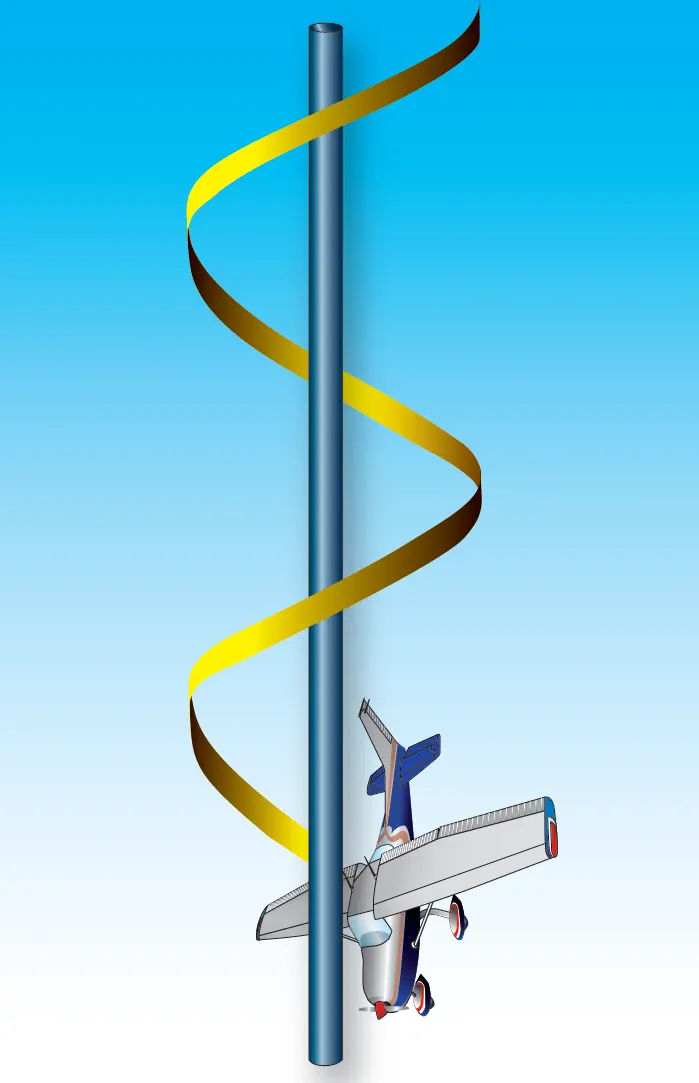
A spin occurs when at least one of the airplane’s wings exceed the critical AOA (stall) with a sideslip or yaw acting on the airplane at, or beyond, the actual stall. An airplane will yaw not only because of incorrect rudder application but because of adverse yaw created by aileron deflection; engine/prop effects, including p-factor, torque, spiraling slipstream, and gyroscopic precession; and wind shear, including wake turbulence. If the yaw had been created by the pilot because of incorrect rudder use, the pilot may not be aware that a critical AOA has been exceeded until the airplane yaws out of control toward the lowering wing. A stall that occurs while the airplane is in a slipping or skidding turn can result in a spin entry and rotation in the direction of rudder application, regardless of which wingtip is raised. If the pilot does not immediately initiate stall recovery, the airplane may enter a spin.
Maintaining directional control and not allowing the nose to yaw before stall recovery is initiated is key to averting a spin. The pilot should apply the correct amount of rudder to keep the nose from yawing and the wings from banking.
Modern airplanes tend to be more reluctant to spin compared to older designs, however it is not impossible for them to spin. Mishandling the controls in turns, stalls, and uncoordinated slow flight can put even the most reluctant airplanes into an accidental spin. Proficiency in avoiding conditions that could lead to an accidental stall/spin situation, and in promptly taking the correct actions to recover to normal flight, is essential. An airplane needs to be stalled and yawed in order to enter a spin; therefore, continued practice in stall recognition and recovery helps the pilot develop a more instinctive and prompt reaction in recognizing an approaching spin. Upon recognition of a spin or approaching spin, the pilot should immediately execute spin recovery procedures.
Spin Procedures
The first rule for spin demonstration is to ensure that the airplane is approved for spins. Please note that this discussion addresses generic spin procedures; it does not cover special spin procedures or techniques required for a particular airplane. Safety dictates careful review of the AFM/POH and regulations before attempting spins in any airplane. The review should include the following items:
- The airplane’s AFM/POH limitations section, placards, or type certification data to determine if the airplane is approved for spins
- Weight and balance limitations
- Recommended entry and recovery procedures
- The current 14 CFR part 91 parachute requirements
Also essential is a thorough airplane preflight inspection, with special emphasis on excess or loose items that may affect the weight, CG, and controllability of the airplane. It is also important to ensure that the airplane is within any CG limitations as determined by the manufacturer. Slack or loose control cables (particularly rudder and elevator) could prevent full anti-spin control deflections and delay or preclude recovery in some airplanes.
Prior to any intentional spin, clear the flight area above and below the airplane for other traffic. This task may occur while slowing the airplane for the spin entry. In addition, all spins should begin at an altitude high enough to complete recovery at or above 1,500 feet AGL. Note that the first turn in a spin results in an altitude loss of approximately 1,000 feet, while each subsequent turn loses about half that amount.
It may be appropriate to introduce spin training by first practicing both power-on and power-off stalls in a clean configuration. This practice helps familiarize the pilot with the airplane’s specific stall and recovery characteristics. In all phases of training, the pilot should take care with handling of the power (throttle), and apply carburetor heat, if equipped, according to the manufacturer’s recommendations
There are four phases of a spin: entry, incipient, developed, and recovery. [Figure 9]
Entry Phase
In the entry phase, the pilot intentionally or accidentally provides the necessary elements for the spin. The entry procedure for demonstrating a spin is similar to a power-off stall. During the entry, the pilot should slowly reduce power to idle, while simultaneously raising the nose to a pitch attitude that ensures a stall. As the airplane approaches a stall, the pilot smoothly applies full rudder in the direction of the desired spin rotation while applying full back (up) elevator to the limit of travel. Unless AFM/POH specifies otherwise, ailerons are maintained in the neutral position during the spin procedure.
Incipient Phase
The incipient phase occurs from the time the airplane stalls and starts rotating until the spin has fully developed. This phase may take two to four turns for most airplanes. In this phase, the aerodynamic and inertial forces have not achieved a balance. As the incipient phase develops, the indicated airspeed will generally stabilize at a low and constant airspeed and the symbolic airplane of the turn indicator should indicate the direction of the spin. The pilot should not use the slip/skid ball (inclinometer) to determine spin direction. The location of the instrument in the airplane determines how the ball will move rather than the direction of the spin. For example, the ball mounted on the left side of the airplane will always move to the left, even in spin with rotation to the right.
The pilot should initiate incipient spin recovery procedures prior to completing 360° of rotation. The pilot should apply full rudder opposite the direction of rotation. The turn indicator shows a deflection in the direction of rotation if disoriented.
Incipient spins that are not allowed to develop into a steady-state spin are the most commonly used maneuver in initial spin training and recovery techniques.
Developed Phase
The developed phase occurs when the airplane’s angular rotation rate, airspeed, and vertical speed are stabilized in a flightpath that is nearly vertical. In the developed phase, aerodynamic forces and inertial forces are in balance, and the airplane’s attitude, angles, and self-sustaining motions about the vertical axis are constant or repetitive, or nearly so. The spin is in equilibrium. It is important to note that some training airplanes will not enter into the developed phase but could transition unexpectedly from the incipient phase into a spiral dive. In a spiral dive the airplane will not be in equilibrium but instead will be accelerating and G load can rapidly increase as a result.
Recovery Phase
The recovery phase occurs when rotation ceases and the AOA of the wings is decreased below the critical AOA. This phase may last for as little as a quarter turn or up to several turns depending upon the airplane and the type of spin. To recover, the pilot applies control inputs to disrupt the spin equilibrium by stopping the rotation and unstalling the wing. To accomplish spin recovery, the pilot should always follow the manufacturer’s recommended procedures. In the absence of the manufacturer’s recommended spin recovery procedures and techniques, use the six-step spin recovery procedure in Figure 10. If the flaps and/or retractable landing gear are extended prior to the spin, they should be retracted as soon as practicable after spin entry.

The following discussion explains each of the six steps a pilot should follow for spin recovery:
- Reduce the power (throttle) to idle. Power aggravates spin characteristics. It can result in a flatter spin attitude and usually increases the rate of rotation.
- Position the ailerons to neutral. Ailerons may have an adverse effect on spin recovery. Aileron control in the direction of the spin may accelerate the rate of rotation, steepen the spin attitude and delay the recovery. Aileron control opposite the direction of the spin may cause flattening of the spin attitude and delayed recovery; or may even be responsible for causing an unrecoverable spin. The best procedure is to ensure that the ailerons are neutral.
- Apply and hold full opposite rudder against the rotation until the rotation stops. Rudder tends to be the most important control for recovery in typical single-engine airplanes, and its application should be brisk and full opposite to the direction of rotation. Avoid slow and overly cautious opposite rudder movement during spin recovery, which can allow the airplane to spin indefinitely, even with anti-spin inputs. A brisk and positive technique results in a more positive spin recovery.
- Apply positive, brisk, and straight-forward elevator (forward of neutral). This step should be taken immediately after full rudder application. Do not wait for the rotation to stop before performing this step. The forceful movement of the elevator decreases the AOA and drives the airplane toward unstalled flight. In some cases, full forward elevator may be required for recovery. Hold the controls firmly in these positions until the spinning stops. (Note: If the airspeed is increasing, the airplane is no longer in a spin. In a spin, the airplane is stalled, and the indicated airspeed should therefore be relatively low and constant and should not be accelerating.)
- Neutralize the rudder after spin rotation stops. Failure to neutralize the rudder at this time, when airspeed is increasing, causes a yawing or sideslipping effect.
- Apply back elevator pressure to return to level flight and adjust power as appropriate. Be careful not to apply excessive back elevator pressure after the rotation stops and the rudder has been neutralized. Excessive back elevator pressure can cause a secondary stall and may result in another spin. Avoid exceeding the G-load limits and airspeed limitations during the pull out.
Again, it is important to remember that the spin recovery procedures and techniques described above are recommended for use only in the absence of the manufacturer’s procedures. The pilot must always be familiar with the manufacturer’s procedures for spin recovery.
Intentional Spins
If the manufacturer does not specifically approve an aircraft for spins, intentional spins are not authorized by the CFRs or suggested by this site. The official sources for determining whether the spin maneuver is approved are:
- Type Certificate Data Sheets or the aircraft specifications
- The limitation section of the FAA-approved AFM/ POH regarding and limiting gross weight, CG range, or amount of fuel
- On a placard located in clear view of the pilot in the airplane (e.g., “NO ACROBATIC MANEUVERS INCLUDING SPINS APPROVED”)
In airplanes placarded against spins, there is no assurance that recovery from a fully-developed spin is possible. Unfortunately, accident records show occurrences in which pilots intentionally ignored spin restrictions. Despite the installation of placards prohibiting intentional spins in these airplanes, some pilots and even some flight instructors attempt to justify the maneuver, rationalizing that the spin restriction results from a “technicality” in the airworthiness standards. They believe that if the airplane was spin tested during its certification process, no problem should result from demonstrating or practicing spins.
Such pilots overlook the fact that certification of normal category single-engine airplanes that occurred in accordance with 14 CFR part 23, section 23.221(a) (which still applies to aircraft certified under that regulation) only required the airplane to recover from a one-turn spin or a three-second spin, whichever takes longer, in not more than one additional turn after initiation of the first control action for recover, or demonstrate compliance with the optional spin resistant requirements of that section. In other words, many of these airplanes were never required to recover from a fully developed spin. 14 CFR part 23, section 23.2150 states the current certification requirements pertaining to spin characteristics for airplanes certified under that regulation going forward. In all airplanes placarded against spins, there is absolutely no assurance that recovery from a fully developed spin is possible under any circumstances. The pilot of an airplane placarded against intentional spins should assume that the airplane could become uncontrollable in a spin.
Weight and Balance Requirement Related to Spins
In airplanes that are approved for spins, compliance with weight and balance requirements is important for safe performance and recovery from the spin maneuver. Pilots should know that even minor weight or balance changes can affect the airplane’s spin recovery characteristics. Such changes can either degrade or enhance the spin maneuver and/or recovery characteristics. For example, the addition of weight in the aft baggage compartment, or additional fuel, may still permit the airplane to be operated within CG, but could seriously affect the spin and recovery characteristics. An airplane that may be difficult to spin intentionally in the utility category (restricted aft CG and reduced weight) could have less resistance to spin entry in the normal category (less restricted aft CG and increased weight). This situation arises from the airplane’s ability to generate a higher AOA. An airplane that is approved for spins in the utility category but loaded in accordance with the normal category may not recover from a spin that is allowed to progress beyond one turn.
Common Errors
Common errors in the performance of intentional spins are:
- Failure to apply full rudder pressure (to the stops) in the desired spin direction during spin entry
- Failure to apply and maintain full up-elevator pressure during spin entry, resulting in a spiral
- Failure to achieve a fully-stalled condition prior to spin entry
- Failure to apply full rudder (to the stops) briskly against the spin during recovery
- Failure to apply sufficient forward-elevator during recovery
- Waiting for rotation to stop before applying forward-elevator
- Failure to neutralize the rudder after rotation stops, possibly resulting in a secondary spin
- Slow and overly cautious control movements during recovery
- Excessive back-elevator pressure after rotation stops, possibly resulting in secondary stall
- Insufficient back-elevator pressure during recovery resulting in excessive airspeed
Spiral Dive
A spiral dive, a nose-low upset, is a descending turn during which airspeed and G-load can increase rapidly and often results from a botched turn. In a spiral dive, the airplane is flying very tight circles, in a nearly vertical attitude and will be accelerating because it is no longer stalled. Pilots typically get into a spiral dive during an inadvertent IMC encounter, most often when the pilot relies on kinesthetic sensations rather than on the flight instruments. A pilot distracted by other sensations can easily enter a slightly nose-low, wing-low, descending turn and, at least initially, fail to recognize this error. Especially in IMC, it may be only the sound of increasing speed that makes the pilot aware of the rapidly developing situation. Upon recognizing the steep nose-down attitude and steep bank, the startled pilot may react by pulling back rapidly on the yoke while simultaneously rolling to wings-level. This response can create aerodynamic loads capable of causing airframe structural damage and/or failure.
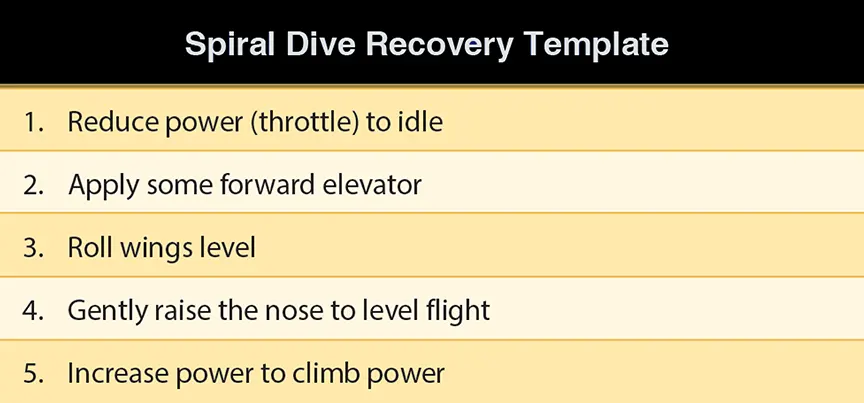
The following discussion explains each of the five steps a pilot should use to recover from a spiral dive:
- Reduce power (throttle) to idle. Immediately reduce power to idle to slow the rate of acceleration.
- Apply some forward-elevator. Prior to rolling the wings level, it is important to unload the G-load on the airplane (“unload the wing”). This is accomplished by applying some forward-elevator pressure to return to about +1G. Apply just enough forward-elevator to ensure that you are not aggravating the spiral with aft-elevator. While generally a small input, this push has several benefits prior to rolling the wings level in the next step – the push reduces the AOA, reduces the G-load, and slows the turn rate while increasing the turn radius, and preventing a rolling pullout. The design limit of the airplane is exceeded more easily during a rolling pullout, so failure to reduce the G-load prior to rolling the wings level could result in structural damage or failure.
- Roll to wings level using coordinated aileron and rudder inputs. Even though the airplane is in a nose-low attitude, continue the roll until the wings are completely level again before performing step four.
- Gently raise the nose to level flight. It is possible that the airplane in a spiral dive might be at or even beyond VNE (never exceed speed) speed. Therefore, control inputs are made slowly and gently at this point to prevent structural failure. Raise the nose to a climb attitude only after speed decreases to safe levels.
- Increase power to climb power. Once the airspeed has stabilized to VY, apply climb power and climb back to a safe altitude.
In general, spiral dive recovery procedures are summarized in Figure 11.
Common Errors
Common errors in the recovery from spiral dives are:
- Failure to reduce power first
- Mistakenly adding power
- Attempting to pull out of dive without rolling wings level
- Simultaneously pulling out of dive while rolling wings level
- Not unloading the Gs prior to rolling level
- Not adding power once climb is established
UPRT Summary
A significant point to note is that UPRT skills are both complex and perishable. Repetition is needed to establish the correct mental models, and recurrent practice/training is necessary as well. The context in which UPRT procedures are introduced and implemented is also an important consideration. The pilot should clearly understand, for example, whether a particular procedure has broad applicability, or is type-specific. To attain the highest levels of learning possible, the best approach starts with the broadest form of a given procedure, then narrows it down to type-specific requirements.