
A glide is a basic maneuver in which the airplane loses altitude in a controlled descent with little or no engine power. Forward motion is maintained by gravity pulling the airplane along an inclined path, and the descent rate is controlled by the pilot balancing the forces of gravity and lift. To level off from a partial power descent using a 1,000 feet per minute descent rate, the pilot should use 10 percent (100 feet in this example) as the distance above the desired level-off altitude to begin raising the nose and adding power to stop the descent and maintain airspeed.
Although glides are directly related to the practice of power-off accuracy landings, they have a specific operational purpose in normal landing approaches, and forced landings after engine failure. Therefore, it is necessary that they be performed more subconsciously than other maneuvers because most of the time during their execution, the pilot will be giving full attention to details other than the mechanics of performing the maneuver. Since glides are usually performed relatively close to the ground, accuracy of their execution and the formation of proper technique and habits are of special importance.
The glide ratio of an airplane is the distance the airplane travels in relation to the altitude it loses. For example, if an airplane travels 10,000 feet forward while descending 1,000 feet, its glide ratio is 10 to 1.
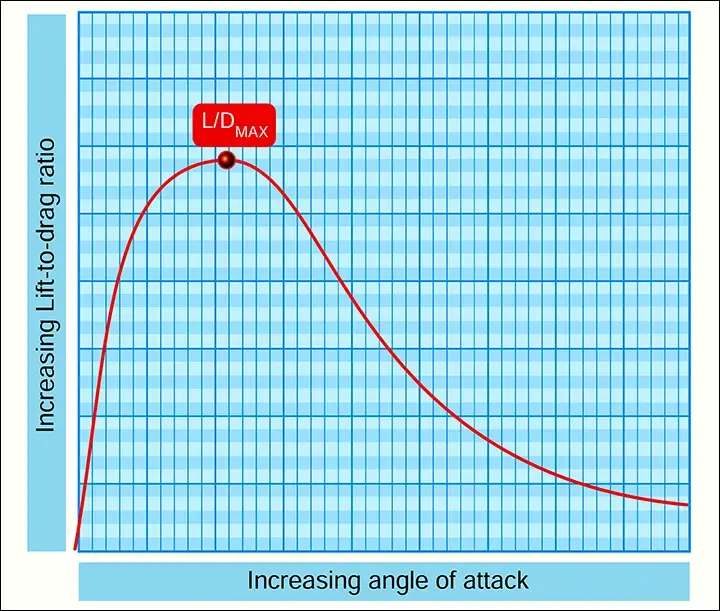
The best glide airspeed is used to maximize the distance flown. This airspeed is important when a pilot is attempting to fly during an engine failure. The best airspeed for gliding is one at which the airplane travels the greatest forward distance for a given loss of altitude in still air. This best glide airspeed occurs at the highest lift-to-drag ratio (L/D). [Figure 1]
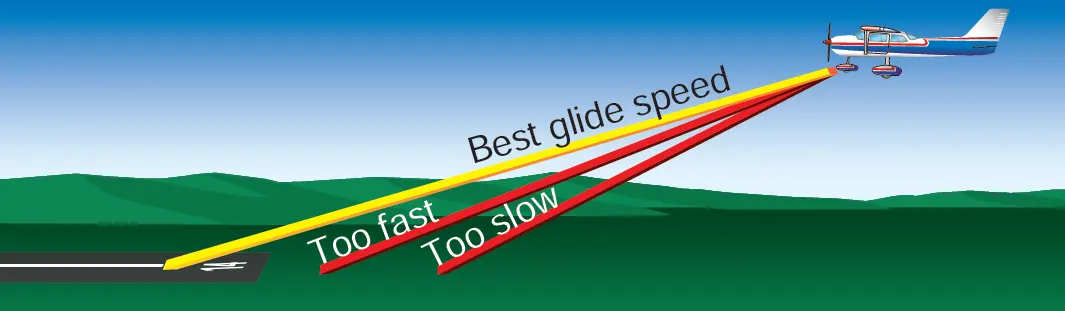
When gliding at airspeed above or below the best glide airspeed, drag increases. Any change in the gliding airspeed results in a proportional change in the distance flown. [Figure 2] As the glide airspeed is increased or decreased from the best glide airspeed, the glide ratio is lessened.
Variations in weight do not affect the glide angle provided the pilot uses the proper airspeed. Since it is the L/D ratio that determines the distance the airplane can glide, weight does not affect the distance flown; however, a heavier airplane needs to fly at a higher airspeed to obtain the same glide ratio. For example, if two airplanes having the same L/D ratio but different weights start a glide from the same altitude, the heavier airplane gliding at a higher airspeed arrives at the same touchdown point in a shorter time. Both airplanes cover the same distance, only the lighter airplane takes a longer time.
Since the highest glide ratio occurs at maximum L/D, certain considerations should be given for drag-producing components of the airplane, such as flaps, landing gear, and cowl flaps. When drag increases, a corresponding decrease in pitch attitude is required to maintain airspeed. As the pitch is lowered, the glide path steepens and reduces the distance traveled. To maximize the distance traveled during a glide, all drag-producing components need to be eliminated if possible.
Wind affects the gliding distance. With a tailwind, the airplane glides farther because of the higher groundspeed. Conversely, with a headwind, the airplane does not glide as far because of the slower groundspeed. This is important for a pilot to understand and manage when dealing with engine-related emergencies and any subsequent forced landing.
During powered operations, the airplane design compensates for the effects of p-factor and propeller slipstream. While these effects disappear during a glide, the design compensation remains. During glides, it is likely that slight left rudder pressure will be required to maintain coordinated flight. In addition, the pilot needs to use greater deflection of the flight controls due to the relatively slow airflow over the control surfaces.
Minimum sink speed is used to maximize the time that the airplane remains in flight. It results in the airplane losing altitude at the lowest rate. Minimum sink speed occurs at a lower airspeed than the best glide speed. Flight at the minimum sink airspeed results in less distance traveled. Minimum sink speed is useful in flight situations where time in flight is more important than distance flown. An example is ditching an airplane at sea. Minimum sink speed is not an often published airspeed but generally is a few knots less than best glide speed.
In an emergency, such as an engine failure, attempting to apply elevator back pressure to stretch a glide back to the runway is likely to lead the airplane landing short and may even lead to loss of control if the airplane stalls. This leads to a cardinal rule of airplane flying: The pilot should not attempt to “stretch” a glide by applying back-elevator pressure and reducing the airspeed below the airplane’s recommended best glide speed. The purpose of pitch control during the glide is to maintain the maximum L/D, which may require fore or aft flight control pressure to maintain best glide airspeed.
To enter a glide, the pilot should close the throttle and, if equipped, advance the propeller lever forward. With back pressure on the elevator flight control, the pilot should maintain altitude until the airspeed decreases to the recommended best glide speed. In most airplanes, as power is reduced, propeller slipstream decreases over the horizontal stabilizer, which decreases the tail-down force, and the airplane’s nose tends to lower immediately. To keep pitch attitude constant after a power change, the pilot should counteract the pitch down with a simultaneous increase in elevator back pressure. This point is particularly important for fast airplanes as they do not readily lose their airspeed—any slight deviation of the airplane’s nose downwards results in an immediate increase in airspeed. Once the airspeed has dissipated to best glide speed, the pitch attitude should be set to maintain that airspeed. This should be done with reference to the natural horizon and with a quick reference to the flight instruments. When the airspeed has stabilized, the airplane should be trimmed to eliminate any flight control pressures held by the pilot. Precision is required in maintaining the best glide airspeed if the benefits are to be realized.
A stabilized, power-off descent at the best glide speed is often referred to as normal glide. The beginning pilot should memorize the airplane’s attitude and speed with reference to the natural horizon and note the sounds made by the air passing over the airplane’s structure, forces on the flight controls, and the feel of the airplane. Initially, the learner may be unable to recognize slight variations in airspeed and angle of bank by vision or by the pressure required on the flight controls. The instructor should point out that an increase in sound levels denotes increasing speed, while a decrease in sound levels indicates decreasing speed. When a sound level change is perceived, the learner should cross-check the visual and pressure references. The learner should use all three airspeed references (sound, visual, and pressure) consciously until experience is gained, and then remain alert to any variation in attitude, feel, or sound.
After a solid comprehension of the normal glide is attained, the learner should be instructed in the differences between normal and abnormal glides. Abnormal glides are those glides conducted at speeds other than the best glide speed. Glide airspeeds that are too slow or too fast may result in the airplane not being able to make the intended landing spot, flat approaches, hard touchdowns, floating, overruns, and possibly stalls and an accident.
Gliding Turns
The absence of the propeller slipstream, , p-factor, loss of effectiveness of the various flight control surfaces at lower airspeeds, and designed-in aerodynamic corrections complicate the task of flight control coordination in comparison to powered flight for the learner. These principles should be thoroughly explained to the learner by the flight instructor.Three elements in gliding turns that tend to force the nose down and increase glide speed are:
- Decrease in lift due to the direction of the lifting force.
- Excessive rudder inputs as a result of reduced flight control pressures.
- The normal stability and inherent characteristics of the airplane to nose-down with the power off.
These three factors make it necessary to use more back pressure on the elevator than is required for a straight glide or a level turn, and they have an effect on control coordination. The rudder compensates for yawing tendencies when rolling in or out of a gliding turn; however, the required rudder pedal pressures are reduced as a result of the reduced forces acting on the control surfaces. A learner may apply excessive rudder pedal pressures based on experience with powered flight. This overcontrol of the aircraft may cause slips and skids and result in potentially hazardous flight control conditions.
Some examples of this hazard are:
- A low-level gliding steep turn during an engine failure emergency. If the rudder is excessively deflected in the direction of the bank while the pilot is increasing elevator back pressure in an attempt to retain altitude, the situation can rapidly turn into an unrecoverable spin.
- During a power-off landing approach. The pilot depresses the rudder pedal with excessive pressure that leads to increased lift on the outside wing, banking the airplane in the direction of the rudder deflection. The pilot may improperly apply the opposite aileron to prevent the bank from increasing while applying elevator back pressure. If allowed to progress, this situation may result in a fully developed cross-control condition. A stall in this situation almost certainly results in a rapid and unrecoverable spin.
Level-off from a glide is really two different maneuvers depending on the type of glide:
- First, in the event of a complete power failure, the best glide speed should be held until necessary to reconfigure for the landing. The pilot should plan for a steeper approach than usual. A 10 percent lead (100 feet if the descent rate is 1,000 feet per minute) factor should be sufficient to slow the descent before landing.
- Second, in the case of simulated power failure training, power should be applied as the 10 percent lead value appears on the altimeter. This allows a slow but positive power application to maintain or increase airspeed while the pilot raises the nose to stop the descent and re-trims the airplane as necessary.
The level-off from a practice glide should be started before reaching the desired altitude because of the airplane’s downward inertia. The amount of lead depends on the rate of descent and the desired airspeed upon completion of the level off. For example, assume the aircraft is in a 500 fpm rate of descent, and the desired final airspeed is higher than the glide speed. The altitude lead should begin at approximately 100 feet above the target altitude. At the lead point, power should be increased to the appropriate level flight cruise power setting. The airplane’s nose tends to rise as airspeed and power increase, and the pilot should smoothly control the pitch attitude such that the level-off is completed at the desired altitude and airspeed. When recovery is being made from a gliding turn to a normal glide, the back pressure on the elevator control, which was applied during the turn, needs to be decreased or the airplane may pitch up and experience a loss of airspeed. This error requires considerable attention and conscious control adjustment to re-establish a normal glide airspeed.
Common errors in the performance of descents and descending turns are:
- Failure to adequately clear for aircraft traffic in the turn direction or descent.
- Inadequate elevator back pressure during glide entry resulting in an overly steep glide.
- Failure to slow the airplane to approximate glide speed prior to lowering pitch attitude.
- Attempting to establish/maintain a normal glide solely by reference to flight instruments.
- Inability to sense changes in airspeed through sound and feel.
- Inability to stabilize the glide (chasing the airspeed indicator).
- Attempting to “stretch” the glide by applying back-elevator pressure.
- Skidding or slipping during gliding turns and not recognizing the difference in rudder forces with and without power.
- Failure to lower pitch attitude during gliding turn entry resulting in a decrease in airspeed.
- Excessive rudder pressure during recovery from gliding turns.
- Inadequate pitch control during recovery from straight glide.
- Cross-controlling during gliding turns near the ground.
- Failure to maintain constant bank angle during gliding turns.