Elementary eights are a family of maneuvers in which each individual maneuver is one that the airplane tracks a path over the ground similar to the shape of a figure eight. There are various types of eights, progressing from the elementary to advanced types. Each eight is intended to develop a pilot’s flight control coordination skills, strengthen their awareness relative to the selected ground references, and enhance division of attention so that flying becomes more instinctive than mechanical. Eights require a greater degree of focused attention to the selected ground references; however, the real significance of eights is that the pilot develops the ability to fly with precision.
Elementary eights include eights along a road, eights across a road, and eights around pylons. Each of these maneuvers is a variation of a turn around a point. Each eight uses two ground reference points about which the airplane turns first in one direction and then the opposite direction—like a figure eight.
https://aircraftsystemstech.com/humix/video/UIWeIoRjlIf
Eights maneuvers are designed for the following purposes:
- Further development of the pilot’s skill in maintaining a specific relationship between the airplane and the ground references.
- Improving the pilot’s ability to divide attention between the flightpath and ground-based references, manipulation of the flight controls, and scanning for outside hazards and instrument indications during both turning and straight-line flight.
- Developing the pilot’s skills to visualize each specific segment of the maneuver and the maneuver as a whole, prior to execution.
- Developing a pilot’s ability to intuitively manipulate flight controls to adjust the bank angle during turns to correct for groundspeed changes in order to maintain constant-radius turns and proper ground track between ground references.
Eights Along a Road
An eight along a road is a ground reference maneuver in which the ground track consists of two opposite 360° adjacent turns. An imaginary line drawn through the center of each 360° turn is perpendicular to the straight-line ground reference (road, railroad tracks, fence line, pipeline right-of-way, etc.) as illustrated in Figure 1. Like the other ground reference maneuvers, the objective is to further develop division of attention while compensating for drift, maintaining orientation with ground references, and maintaining a constant altitude.
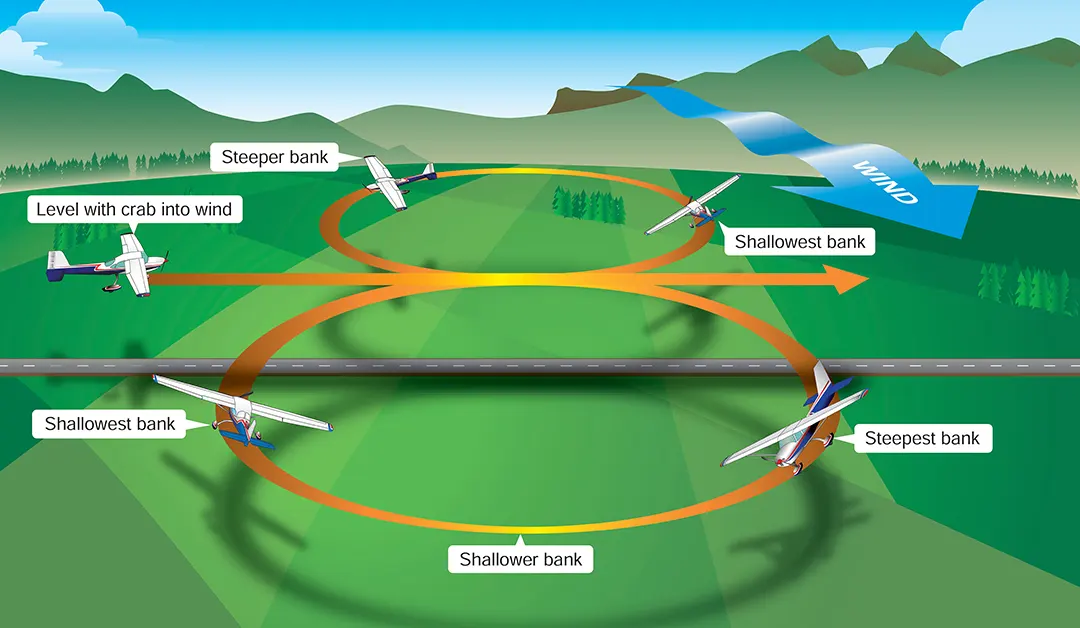
Although eights along a road may be performed with the wind blowing parallel or perpendicular to the straight-line ground reference, only the perpendicular wind situation is explained since the principles involved are common to each. The pilot should select a straight-line ground reference that is perpendicular to the wind and position the airplane parallel to and directly above the straight-line ground reference. Since this places the airplane in a crosswind position, the pilot should compensate for the wind drift with an appropriate wind correction angle.
The following description is illustrated in Figure 1. The airplane is initially in a crosswind position, perpendicular to the wind, and over the ground-based reference. The first turn should be to the right toward a downwind position starting with a steepening bank. When the entry is made into the turn, it requires that the turn begin with a medium bank and gradually steepen to its maximum bank angle when the airplane is directly downwind. As the airplane turns from downwind to crosswind, the bank angle needs to be gradually reduced since groundspeed is decreasing; however, 1/2 of the reduction in groundspeed occurs during the first 2/3 of the turn from downwind to crosswind.
The pilot needs to control the bank angle as well as the rate at which the bank angle is reduced so that the wind correction angle is correct. Assuming that the wind is coming from the right side of the airplane, the airplane heading should be slightly ahead of its position over the ground. When the airplane completes the first 180° of ground track, it is directly crosswind, and the airplane should be at the maximum wind correction angle.
As the turn is continued toward the upwind, the airplane’s groundspeed is decreasing, which requires the pilot to reduce the bank angle to slow the rate of turn. If the pilot does not reduce the bank angle, the continued high rate of turn would cause the turn to be completed prematurely. Another way to explain this effect is—the wind is drifting the airplane downwind at the same time its groundspeed is slowing. If the airplane has a steeper-than-required bank angle, its rate of turn will be too fast and the airplane will complete the turn before it has had time to return to the ground reference.
When the airplane is directly upwind, which is at 270° into the first turn, the bank angle should be shallow with no wind correction. As the airplane turns crosswind again, the airplane’s groundspeed begins increasing; therefore, the pilot should adjust the bank angle and corresponding rate of turn proportionately in order to reach the ground reference at the completion of the 360° ground track. The pilot may vary the bank angle to correct for any previous errors made in judging the returning rate and closure rate. The pilot should time the rollout so that the airplane is straight-and-level over the starting point with enough drift correction to hold it over the straight-line ground reference. Assuming that the wind is now from the left, the airplane should be banked at a left wind correction angle.
After momentarily flying straight-and-level with the established wind correction, along the ground reference, the pilot should roll the airplane into a medium bank-turn in the opposite direction to begin the 360° turn on the upwind side of the ground reference. The wind will decrease the airplane’s groundspeed and drift the airplane back toward the ground reference; therefore, the pilot should decrease the bank slowly during the first 90° of the upwind turn in order to establish a constant radius. During the next 90° of turn, the pilot should increase the bank angle, since the groundspeed is increasing, to maintain a constant radius and establish the proper wind correction angle before reaching the 180° upwind position.
As the remaining 180° of turn continues, the wind becomes a tailwind and then a crosswind. Consistent with previous downwind and crosswind descriptions, the pilot should increase the bank angle as the airplane reaches the downwind position and decrease the bank angle as the airplane reaches the crosswind position. Further, the rate of roll-in and roll-out should be consistent with how fast the groundspeed changes during the turn. Remember, when turning from an upwind or downwind position to a crosswind position, 1/2 of the groundspeed change occurs during the first 2/3 of the 90° turn. The final 1/2 of the change in groundspeed occurs during the last 1/3 of the turn. In contrast, when turning from a crosswind position to an upwind or downwind position, the first 1/2 of the groundspeed change occurs during the first 1/3 of the 90° turn. The final 1/2 of the change in groundspeed occurs during the last 2/3 of the turn.
To successfully perform eights along a ground reference, the pilot should be able to smoothly and accurately coordinate changes in bank angle to maintain a constant-radius turn and counteract drift. The speed in which the pilot can anticipate these corrections directly affects the accuracy of the overall maneuver and the amount of attention that can be directed toward scanning for outside hazards and instrument indications.
Eights Across a Road
This maneuver is a variation of eights along a road and involves the same principles and techniques. The primary difference is that at the completion of each loop of the figure eight, the airplane should cross an intersection or a specific ground reference point. [Figure 2]
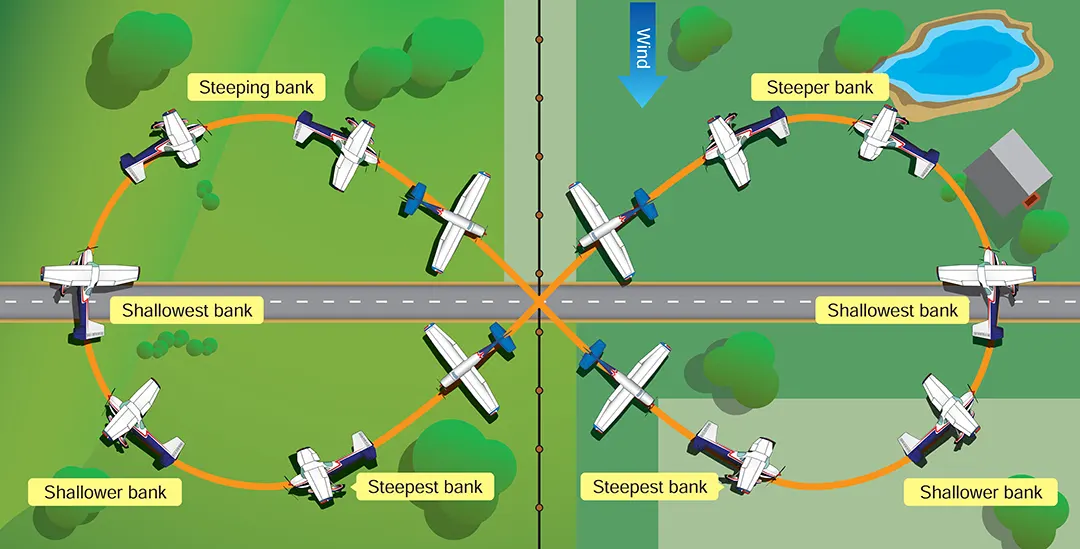
The loops should be across the road and the wind should be perpendicular to the loops. Each time the reference is crossed, the crossing angle should be the same, and the wings of the airplane should be level. The eights may also be performed by rolling from one bank immediately to the other, directly over the reference.
Eights Around Pylons
Eights around pylons is a ground reference maneuver with the same principles and techniques of correcting for wind drift as used in turns around a point and the same objectives as other ground track maneuvers. Eights around pylons utilizes two ground reference points called “pylons.” Turns around each pylon are made in opposite directions to follow a ground track in the form of a figure 8. [Figure 3]
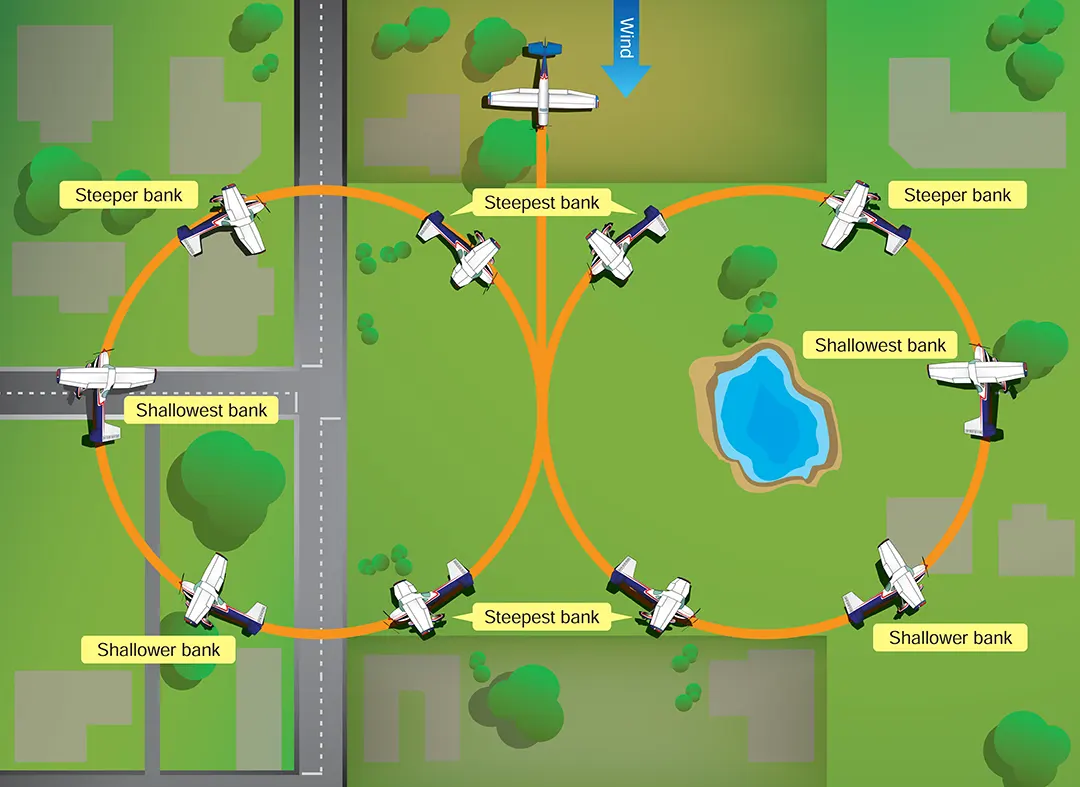
The pattern involves flying downwind between the pylons and upwind outside of the pylons. It may include a short period of straightand-level flight while proceeding diagonally from one pylon to the other. The pylons should be on a line perpendicular to the wind. The maneuver should be started with the airplane on a downwind heading while passing mid-way between the pylons. The distance between the pylons and the wind velocity determines the initial angle of bank required to maintain a constant turn radius from the pylons during each turn. The steepest banks are necessary just after each turn entry and just before the rollout from each turn where the airplane is headed downwind and the groundspeed is highest. The shallowest banks are when the airplane is headed directly upwind and the groundspeed is lowest.
As in other ground reference maneuvers, the rate at which the bank angle changes depends on the wind velocity. If the airplane proceeds diagonally from one turn to the other, the rollout from each turn needs to be completed on the proper heading with sufficient wind correction angle to ensure that after brief straight-and-level flight, the airplane arrives at the point where a turn of the same radius can be made around the other pylon. The straight-and-level flight segments should be tangent to both circular patterns.
Common Errors
Common errors in the performance of elementary eights are:
- Failure to adequately clear the surrounding area for safety hazards, initially and throughout the maneuver.
- Poor selection of ground references.
- Failure to establish a constant, level altitude prior to entering the maneuver.
- Failure to maintain adequate altitude control during the maneuver.
- Failure to properly assess wind direction.
- Failure to properly execute constant-radius turns.
- Failure to manipulate the flight controls in a smooth and continuous manner.
- Failure to establish the appropriate wind correction angles.
- Failure to apply coordinated aileron and rudder pressure, resulting in slips or skids.
- Failure to maintain orientation as the maneuver progresses.
Eights on Pylons
The eights on pylons is the most advanced and difficult of the ground-reference maneuvers. Because of the techniques involved, the eights on pylons are unmatched for developing intuitive control of the airplane. Similar to eights around pylons except altitude is varied to maintain a specific visual reference to the pivot points.
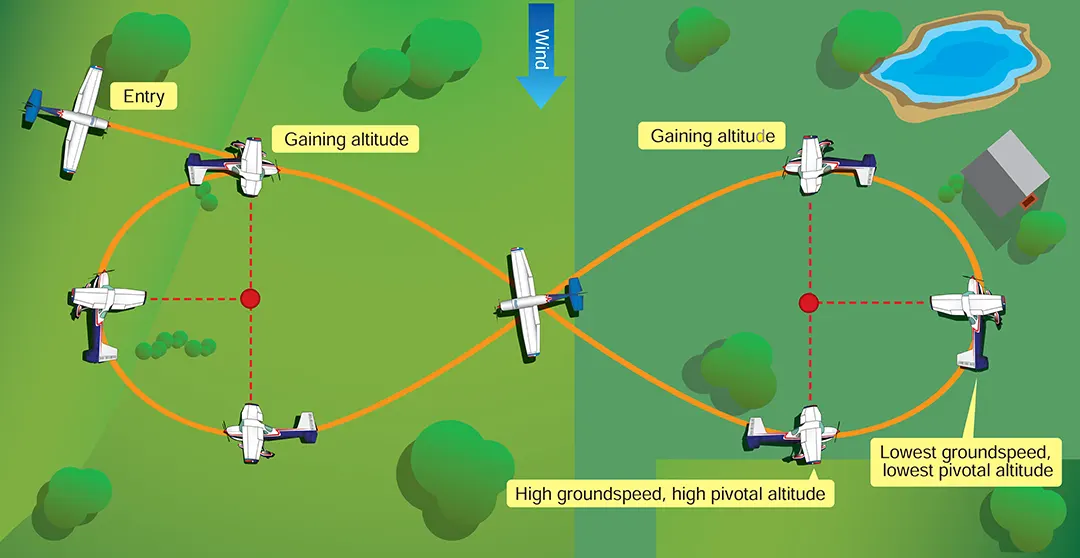
When performing eights on pylons, the pilot imagines there is a line parallel to the airplane’s lateral axis that extends from the pilot’s eyes to the pylon. Along this line, the airplane appears to pivot as it turns around the pylon. In other words, if a taut string extended from the pilot’s eyes to the pylon, the string would remain parallel to lateral axis as the airplane makes a turn around the pylon. The goal of eights on pylons is to keep the line from the pilot’s eyes to the pylon parallel to the lateral axis. The string should not be at an angle to the lateral axis while the airplane flies around the pylon. [Figure 4]
When explaining eights on pylons, instructors sometimes use the term “wingtip” to represent the proper visual reference line to the pylon. This interpretation is not correct. High-wing, low-wing, swept-wing, and tapered-wing airplanes, as well as those with tandem or side-by-side seating, all present different angles from the pilot’s eye to the wingtip. [Figure 5]
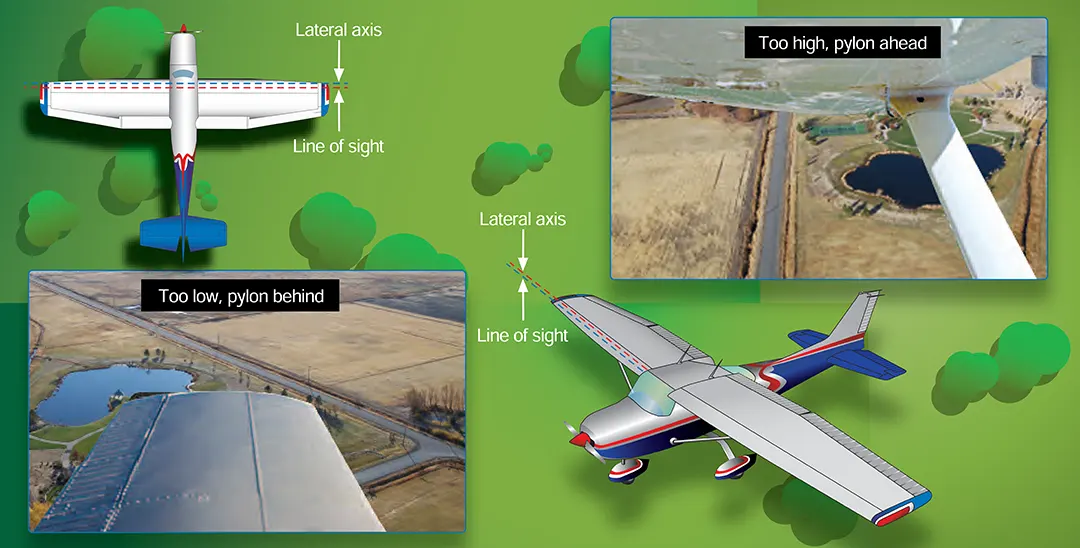
The visual reference line, while not necessarily on the wingtip itself, may be positioned in relation to the wingtip (ahead, behind, above, or below), and differs for each pilot and from each seat in the airplane. This is especially true in tandem (fore and aft) seat airplanes. In side-by-side type airplanes, there is very little variation in the visual reference lines for different people, if those people are seated with their eyes at approximately the same level. Therefore, in the correct performance of eights on pylons, as in other maneuvers requiring a lateral reference, the pilot should use a visual reference line that, from eye level, parallels the lateral axis of the airplane.
The altitude that is appropriate for eights on pylons is called the “pivotal altitude” and is determined by the airplane’s groundspeed. In previous ground-track maneuvers, the airplane flies a prescribed path over the ground and the pilot attempts to maintain the track by correcting for the wind. With eights on pylons, the pilot maintains lateral orientation to a specific spot on the ground. This develops the pilot’s ability to maneuver the airplane accurately while dividing attention between the flightpath and the selected pylons on the ground.
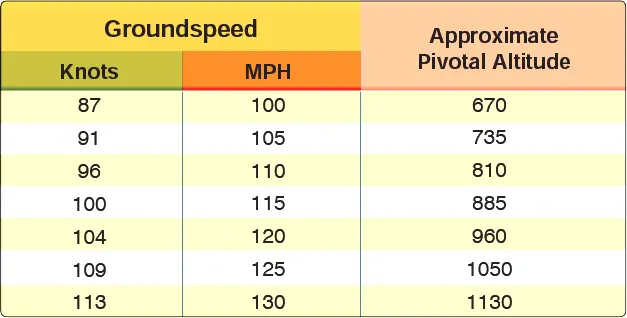
An explanation of the pivotal altitude is also essential. First, a good rule of thumb for estimating the pivotal altitude is to square the groundspeed, then divide by 15 (if the groundspeed is in miles per hour) or divide by 11.3 (if the groundspeed is in knots), and then add the mean sea level (MSL) altitude of the ground reference. The pivotal altitude is the altitude at which, for a given groundspeed, the projection of the visual reference line to the pylon appears to pivot. Visually, a taut string, if extended from the pilot’s eyes to the pylon, would remain parallel to lateral axis as the airplane makes a turn around the pylon. [Figure 6] The pivotal altitude does not vary with the angle of bank unless the bank is steep enough to affect the groundspeed.
Distance from the pylon affects the angle of bank. At any altitude above that pivotal altitude, the projected reference line appears to move rearward in a circular path in relation to the pylon. Conversely, when the airplane is below the pivotal altitude, the projected reference line appears to move forward in a circular path. [Figure 7] To demonstrate this, the pilot will fly at maneuvering speed and at an altitude below the pivotal altitude, and then place the airplane in a medium-banked turn. The projected visual reference line appears to move forward along the ground (pylon appears to move back) as the airplane turns. The pilot then executes a climb to an altitude well above the pivotal altitude. When the airplane is again at maneuvering speed, it is placed in a medium-banked turn. At the higher altitude, the projected visual reference line appears to move backward across the ground (pylon appears to move forward).
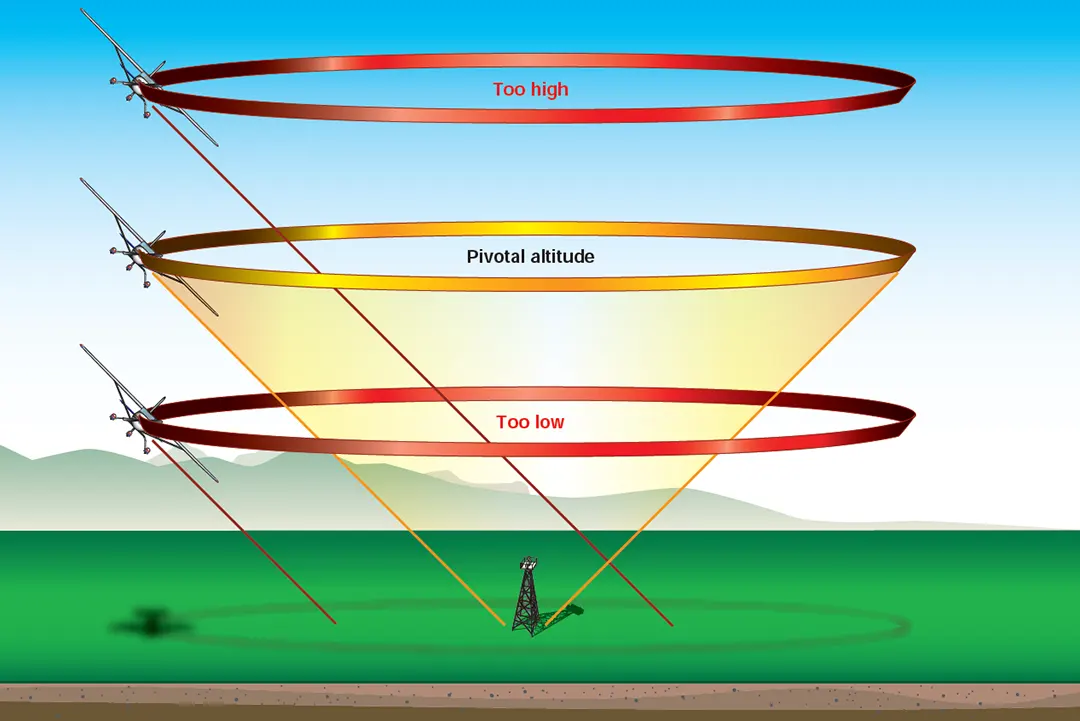
After demonstrating the maneuver at a high altitude, the pilot should reduce power and begin a descent at maneuvering speed in a continuing medium-bank turn around the pylon. The apparent backward movement of the projected visual reference line with respect to the pylon will slow down as altitude is lost and will eventually stop for an instant. If the pilot continues the descent below the pivotal altitude, the projected visual reference line with respect to the pylon will begin to move forward.
The altitude at which the visual reference line ceases to move across the ground is the pivotal altitude. If the airplane descends below the pivotal altitude, the pilot should increase power to maintain airspeed while regaining altitude to the point at which the projected reference line moves neither backward nor forward but actually pivots on the pylon. In this way, the pilot can determine the pivotal altitude of the airplane.
The pivotal altitude changes with variations in groundspeed. Since the headings throughout turns continuously vary from downwind to upwind, the groundspeed constantly changes. This results in the proper pivotal altitude varying slightly throughout the turn. The pilot should adjust for this by climbing or descending, as necessary, to hold the visual reference line on the pylons.
Selecting proper pylons is an important factor of successfully performing eights on pylons. They should be sufficiently prominent so the pilot can view them when completing the turn around one pylon and heading for the next. They should also be adequately spaced to provide time for planning the turns but not spaced so far apart that they cause unnecessary straight-and-level flight between the pylons. The distance between the pylons should allow for the straight-and-level flight segment to last from 3 to 5 seconds. The selected pylons should also be at the same elevation, since differences of over a few feet necessitate climbing or descending between each turn. The pilot should select two pylons along a line that lies perpendicular to the direction of the wind.
The pilot should estimate the pivotal altitude during preflight planning. Weather reports and consultation with other pilots flying in the area may provide both the wind direction and velocity. If the references are previously known (many flight instructors already have these ground-based references selected), the sectional chart will provide the MSL of the references, the Pilot’s Operating Handbook (POH) provides the range of maneuvering airspeeds (based on weight), and the wind direction and velocity can be estimated to calculate the appropriate pivotal altitudes. The pilot should calculate the pivotal altitude for each position: upwind, downwind, and crosswind.
The pilot should begin the eight on pylons maneuver by flying diagonally crosswind between the pylons to a point downwind from the first pylon, so that the first turn can be made into the wind. As the airplane approaches a position where the pylon appears to be just ahead of the wingtip, the pilot should begin the turn by lowering the upwind wing to the point where the visual reference line aligns with the pylon. The reference line should appear to pivot on the pylon. As the airplane heads upwind, the groundspeed decreases, which lowers the pivotal altitude. As a result, the pilot should descend to hold the visual reference line on the pylon. As the turn progresses on the upwind side of the pylon, the wind becomes more of a crosswind. Since this maneuver does not require the turn to be completed at a constant radius, the pilot does not need to apply drift correction to complete the turn.
If the visual reference line appears to move ahead of the pylon (pylon appears to move back), the pilot should increase altitude. If the visual reference line appears to move behind the pylon (pylon appears to move ahead), the pilot should decrease altitude. Deflecting the rudder to yaw the airplane and force the wing and reference line forward or backward to the pylon places the airplane in uncoordinated flight, at low altitude, with steep bank angles and should not be attempted.
As the airplane turns toward a downwind heading, the pilot should rollout from the turn to allow the airplane to proceed diagonally to a point tangent on the downwind side of the second pylon. The pilot should complete the rollout with the proper wind correction angle to correct for wind drift, so that the airplane arrives at a point downwind from the second pylon that is equal in distance from the pylon as the corresponding point was from the first pylon at the beginning of the maneuver.
At this point, the pilot should begin a turn in the opposite direction by lowering the upwind wing to the point where the visual reference line aligns with the pylon. The pilot should then continue the turn the same way the corresponding turn was performed around the first pylon but in the opposite direction.
With prompt correction, and a very fine control pressures, it is possible to hold the visual reference line directly on the pylon even in strong winds. The pilot may make corrections for temporary variations, such as those caused by gusts or inattention, by reducing the bank angle slightly to fly relatively straight to bring forward a lagging visual reference line or by increasing the bank angle temporarily to turn back a visual reference line that has moved ahead. With practice, these corrections may become slight enough to be barely noticeable. It is important to understand that variations in pylon position are according to the apparent movement of the visual reference line. Attempting to correct pivotal altitude by the using the altimeter is ineffective.
Eights on pylons are performed at bank angles ranging from shallow to steep. [Figure 8] The pilot should understand that the bank chosen does not alter the pivotal altitude. As proficiency is gained, the instructor should increase the complexity of the maneuver by directing the learner to enter at a distance from the pylon that results in a specific bank angle at the steepest point in the pylon turn.
Common Errors
The most common error in attempting to hold a pylon is incorrect use of the rudder. When the projection of the visual reference line moves forward with respect to the pylon, many pilots tend to apply inside rudder pressure to yaw the wing backward. When the reference line moves behind the pylon, pilots tend to apply outside rudder pressure to yaw the wing forward. The pilot should use the rudder only for coordination.
Other common errors in the performance of eights on pylons are:
- Failure to adequately clear the surrounding area for safety hazards, initially and throughout the maneuver.
- Skidding or slipping in turns (whether trying to hold the pylon with rudder or not).
- Excessive gain or loss of altitude.
- Poor choice of pylons.
- Not entering the pylon turns into the wind.
- Failure to assume a heading when flying between pylons that will compensate sufficiently for drift.
- Failure to time the bank so that the turn entry is completed with the pylon in position.
- Abrupt control usage.
- Inability to select pivotal altitude.
